In this blog I’ll explore the new Secret capability in vRealize Automation Cloud. The use case includes the following:
- Deploy a CentOS 8 machine
- Store the new user password and SSH key in a Secret
- Configure the machine using Cloud-Init
- Assign the password and SSH key from a vRA Cloud Secret
- Verify the password and SSH key assignment.
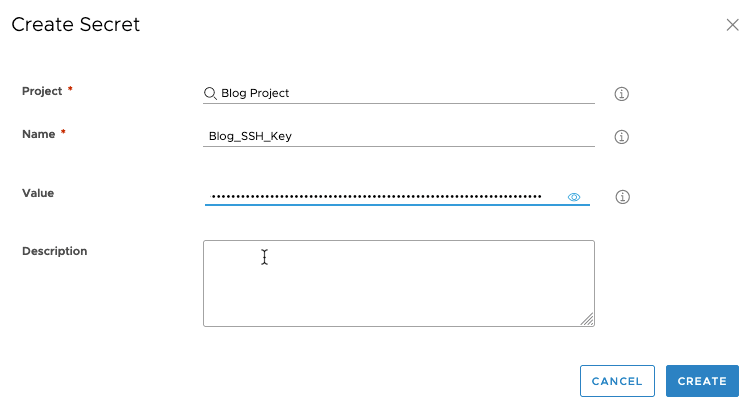
First, add two Secrets. Go to Infrastructure -> Secrets, then click NEW SECRET.

The first one will be the SSH key. Find your project, give it a name, then paste in the key. Click CREATE to save the values. Repeat the process for the Password secret.
The Cloud Template is fairly straight forward. The new user password will be assigned the secret.Blog_Password value, and the ssh_authorized_keys comes from secret.Blog_SSH_Key value.
inputs:
  username:
    title: username
    type: string
resources:
  web1:
    type: Cloud.Machine
    networks:
      - name: '${resource.AppNetwork.name}'
    properties:
      image: CentOS 8
      flavor: generic.small
      networks:
        - name: '${AppNetwork.name}'
          network: '${resource.AppNetwork.id}'
      remoteAccess:
        authentication: usernamePassword
        password: changeMe
        username: '${input.username}'
      cloudConfig: |
        #cloud-config
        chpasswd: { expire: False }
        ssh_pwauth: True
        users:
          - default
          - name: ${input.username}
            passwd: ${secret.Blog_Password}
            sudo: ['ALL=(ALL) NOPASSWD:ALL']
            groups: [wheel, sudo, admin]
            shell: '/bin/bash'
            lock_passwd:  false
            ssh_authorized_keys:
              - ${secret.Blog_SSH_Key}
        preserve_hostname:  false
        chpasswd:
          list: |
            ${input.username}:${secret.Blog_Password}
          expire:  False
        runcmd:
          - echo "disable_vmware_customization: false " >> /etc/cloud/cloud.cfg
          - sed -i 's/D \/tmp 1777 root root -/#D \/tmp 1777 root root -/g' /usr/lib/tmpfiles.d/tmp.conf
  AppNetwork:
    type: Cloud.Network
    properties: {}
Now a look at how the secret values are displayed on a deployed machine. Open the deployment, then click on the machine. Expand Cloud Config to view the secret values sent to the machine.

As you can see the values for the new user are encrypted, and do not match stored secret values (The user password is set to VMware1!). Good so far.
Now to see if the password and SSH key actually work. A quick SSH using the key should be sufficient.

Oops. Looks like the key didn’t work, but I was able to login using the password. Time for a bit of troubleshooting. Using elevated permissions (set in Cloud-Init), I take a look at the cloud-init config sent down to the machine.
#more /var/lib/cloud/instance/cloud-config.txtHmm, looks the key had a line return in it.

I’ll need to edit/update the Blog_SSH_Key secret. After finding my troublesome secret, I click Edit.

The previously stored value is not viewable, I can only update it.

The new value is viewable until I save it. I made sure this one didn’t have a line return in it. The changes are committed when I click Save.

Now to test the change on a newly deployed machine. I’ll use the same SSH command, with the exception of changing the IP address.

Success! I was able to log in using the key.
In this blog I explored a simple application using two vRA Cloud Secrets, troubleshooting, and updating a secret Value. The VMware developers did a great job. I’m sure the new feature will prove to be very valuable.
I’m not sure when this will get pushed down into vRA 8.x. Please contact your VMware team for more information.
Go forth and succeed.