In this second part, I’ll discuss the actual Code Stream pipeline.
As stated before, the inspiration was William Lams wonderful Power Shell scripts to deploy a nested environment from a CLI. His original logic was retained as much as possible, however due to the nature of K8S a few things had to be changed. I’ll try to address those as they come up.
After some thought I decided to NOT allow the requester to select the amount of Memory, vCPU, or VSAN size. Each Esxi host has 24G of Ram, 4 vCPU, and contributes a touch over 100G to the VSAN. The resulting cluster has 72G of RAM, 12 vCPUs and a roughly 300G VSAN. Only Standard vSwitches are configured in each host.
The code, pipeline and other information is available on this github repo.
Deployment of the Esxi hosts is initiated by ‘deployNestedEsxi.ps1’. There are few changes from the original script.
The OVA configuration is only grabbed once. Then only the specific host settings (IP Address and Name are changed.
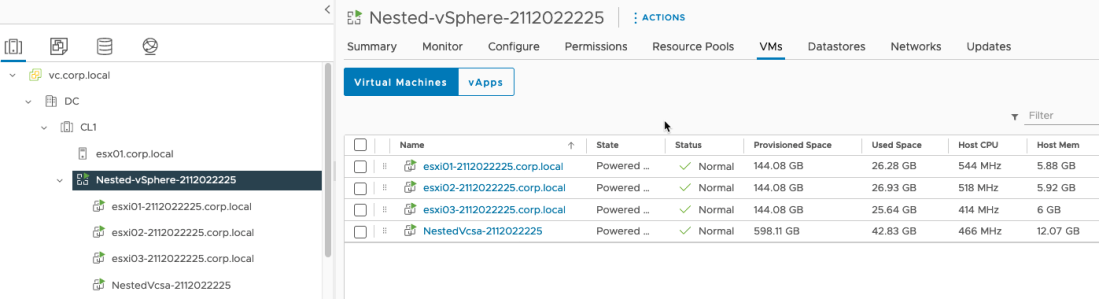
The hosts are moved into a vApp once built.
The NetworkAdapter settings are performed after deployment.
Persisted the log to /var/workspace_cache/logs/vsphere-deployment-$BUILDTIME.log.
Deployment of the vCSA is handled by ‘deployVcsa.ps1’ Some notable changes from the original code include.
Hardcoded the SSO username to administrator@vsphere.local.
Hardcoded the size to ‘tiny’.
Save the log file to /var/workspace_cache/logs/NestedVcsa-$BUILDTIME.log.
Save the configuration template to /var/workspace_cache/vcsajson/NestedVcsa-$BUILDTIME.json.
Move the VCSA into the vApp after deployment is complete.
And finally ‘configureVc.ps1’ sets up the Cluster and VSAN. Some changed include.
Hardcoded the Datacenter name (DC), and Cluster (CL1).
Import the Esxi hosts by IP (No DNS records setup for the hosts or vCenter).
Append the configuration results to /var/workspace_cache/logs/vsphere-deployment-$BUILDTIME.log.
So there you go, down and simple Code Stream pipeline to deploy a nested vSphere environment in about an hour.
Stay tuned. The next article will include an NSX-T deployment.
Been a while since my last post. Over the last couple of months I’ve been tinkering with using Code Stream to deploy a Nested Esxi / vCenter environment.
Well let’s just say it’s been an adventure. Much has been learned through trial and (mostly) error.
For example in Williams script, all of the files are located on the workstation where the script runs. Creating a custom docker image with those files would have resulted in a HUGE file, almost 16GB (Nested ESXi appliance, vCSA appliance and supporting files, and NSX-T OVA files). As one of my co-worker says, “Don’t be that guy”.
At first I tried cloning the files into the container as part of the CI setup. Downloading the ESXi OVA worked fine, but failed when I tried copying over the vCSA files. I think it’s just too much.
I finally opted to use a Kubernetes Code Stream instead of a Docker pipeline. This allowed me to use a Persistent Volume Claim.
Kubernetes setup
Some of the steps may lack details, as this has been an ongoing effort and just can’t remember everything. Sorry peeps!
Create two Name Spaces, codestream-proxy and codestream-workspace. Codestream-proxy is used by Code Stream to host a Proxy pod.
Codestream-workspace will host the containers running the pipeline code.
Next came the service account for Code Stream. The path of least resistance was to simply assign ‘cluster-admin’ to the new service account. NOTE: Don’t do this in a production environment.
Next came the Persistent Volume (pv) and Persistent Volume Claim (pvc). My original pv was set to 20GI, which after some testing was determined too small. It was subsequently increased it to 30GI. The larger pv allowed me to retain logs and configurations between runs (for troubleshooting).
The final step in k8s is to get the Service Account token. In this example the SA is called ‘codestream’ (So creative).
k get secret codestream-token-blah!!! -o jsonpath={.data.token} | base64 -d | tr -d "\n"

eyJhbGciOiJSUzI1NiIsImtpZCI6IncxM0hIYTZndS1xcEdFVWR2X1Z4UFNLREdQcGdUWDJOWUF1NDE5YkZzb.........
Copy the token, then head off to Code Stream.
Codestream setup
There I added a Variable to hold the token, called DAG-K8S-Secret.
Then went over to Endpoints, where I added a new Kubernetes endpoint.
Repo setup
The original plan was to download the OVA/OVF files from a repo every time the pipeline ran. However an error would occur on every VCSA file set download. Adding more memory to the container didn’t fix the problem, so I had to go in another direction.
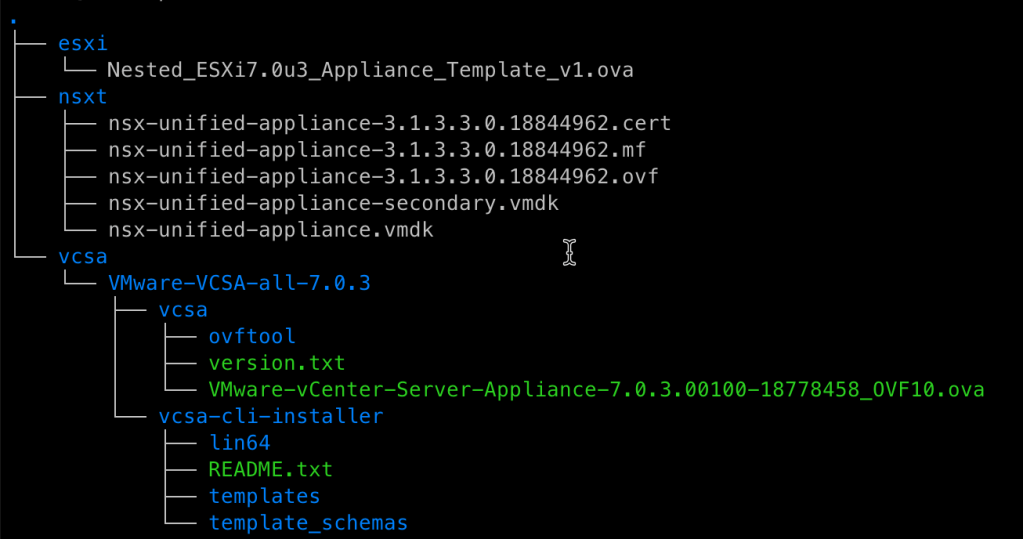
The repo is well connected to the k8s cluster, so the transfer is pretty quick. Here is the directory structure for the repo (http://repo.corp.local/repo/).
NOTE: You will need a valid account to download VCSA and NSX-T.
NOTE: NSX-T will be added to the pipeline later.
Simply copying the files interactively on the k8s node seemed like the next logical step. Yes the files copied over nicely, but any attempt to deploy the VCSA appliance would throw a python error complaining about a missing ‘vmware’ module.
However I was able to run the container manually, copy the files over and run the scripts successfully. Maybe a file permissions issue?
Finally I ran the pipeline with a long sleep at the beginning. Using an interactive session, and copied the files over. This fixed the problem.
Here are the commands I used to copy the files over interactively.
k -n codestream-workspace exec -it po/running-cs-pod-id bash
wget -mxnp -q -nH http://repo.corp.local/repo/ -P /var/workspace_cache/ -R "index.html*"
# /var/workspace_cache is the mount point for the persistent volume
# need to chmod +x a few files to get the vCSA to deploy
chmod +x /var/workspace_cache/repo/vcsa/VMware-VCSA-all-7.0.3/vcsa/ovftool/lin64/ovftool*
chmod +x /var/workspace_cache/repo/vcsa/VMware-VCSA-all-7.0.3/vcsa/vcsa-cli-installer/lin64/vcsa-deploy*
This should do it for now. The next article will cover some of the pipeline details, and some of the changes I had to make to William Lams Powershell code.
One of my peers came up with an interesting use case today. His customer wanted to mount an existing disk on a virtual machine using a vRA Cloud day 2 action.
I couldn’t find an out of the box workflow or action on my vRO, which meant I had to do this thing from scratch.
After a quick look around I found a PowerCli cmdlet (New-Hardisk) which allowed me to mount an existing disk.
My initial attempts to just run it as a scriptable task resulted in the following error.
Hmm, so how do you increase the memory in a scriptable task? Simple, you can’t. Thus I had to move the script into an action, which does allow me to increase the memory. After some tinkering I found that 256M was sufficient to run the code.
function Handler($context, $inputs) {
    # $inputs:
    ## vmName: string
    ## vcName: string (in configuration element)
    ## vcUsername: string (in configuration element)
    ## vcPassword: secureString (in configuration element)
    ## diskPath: string. Example in code.
    # output:
    ## actionResult: Not used
    $inputsString = $inputs | ConvertTo-Json -Compress

    Write-Host "Inputs were $inputsString"

    $output=@{status = 'done'}

    # connect to viserver
    Set-PowerCLIConfiguration -InvalidCertificateAction:Ignore -Confirm:$false
    Connect-VIServer -Server $inputs.vcName -Protocol https -User $inputs.vcUsername -Password $inputs.vcPassword

    # Get vm by name
    Write-Host "vmName is $inputs.vmName"
    $vm = Get-VM -Name $inputs.vmName

    # New-HardDisk -VM $vm -DiskPath "[storage1] OtherVM/OtherVM.vmdk"
    $result = New-HardDisk -VM $vm -DiskPath $inputs.diskPath
    Write-Host "Result is $result"

    return "It worked!"
}
Looking at the code, you will notice an input of vmName (used by PS to find the VM). Getting the vmName is actually pretty stupid simple using JavaScript. My first task in the WF takes care of this.
// get the vmName
// $inputs.vm
// output: vmName
vmName = vm.name
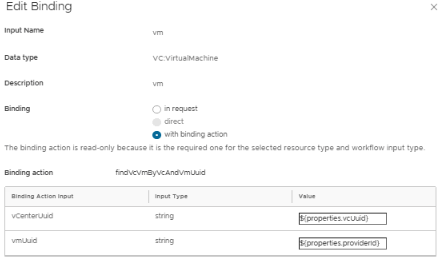
The next step was to setup a resource action. The settings are shown in the following snapshot. Please note the setting within the green box. ‘vm’ is set with a binding action.
Changing the binding is fairly simple. Just click the binding link, then change the value to ‘with binding action’. The default values work just fine.
The disk I used in the test was actually a copy of another VM boot disk. It was copied over to another datastore, then renamed to ‘ExistingDisk2.vmdk’. The full diskPath was [dag-nfs] ExistingDisk/ExistingDisk2.vmdk.
Running the day 2 action on deployed machine seemed to work, as the WF logs show.
So there you have a basic PolyGlot vRO workflow using PowerCli and JavaScript.
I trust this quick blog was helpful in some small way.
I took some time this week to update William Lams Nested vSphere 6.5 with NSX-T to Nested vSphere 6.7U1/NSX-T 2.3.1, to kickstart a new customer project.
This version updated some of the vCSA OVF JSON fields, and added support for PowerShell 6.1. It was tested against PowerCLI 11.2 on a Windows 10 machine.