One of my current tasks is to leverage vRealize Automation Orchestrator to meet the following use case.
Get the next available subnet from InfoBlox
Reserve the gateway and other IP’s in the new subnet
Create a new NSX-T segment
Create new NSX-T security groups
Discover the new segment in vRealize Automation Cloud
Assign the new InfoBlox to the discovered Fabric Network
Create a new Network Profile in vRA Cloud
This weeks goal was to get the InfoBlox part working. Well I had it working two years ago, but couldn’t remember how I did it (CRS).
Today I’ll discuss how to use vRO to get the next available subnet from InfoBlox. The solution uses a PSM I build, along with the PowerShell script which actually does the heavy lifting. One key difference between my solution and the one from VMware’s documentation is the naming of the zip file. This affects how to import and use it in vRO.
The code used in this example is available in this GitHub repo. Clone the repo, then run the following command to zip up the files.
zip -r -x ".git/*" -x "README.md" -X nextibsubnet.zip .
Next import the zip file into vRO, add some inputs, modify the output, then finally run it.
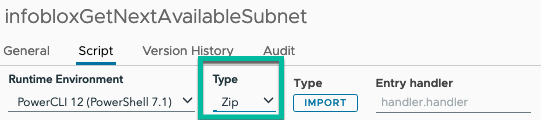
Within vRO, add a new Action. Then change the script type to “PowerCli 12 (PowerShell 7.1).
PowerShell Script Type
Change the Type to ‘Zip’ by clicking on the dropdown under ‘Type’ and selecting ‘Zip’
Click ‘Import’, then browse to the folder containing the zip file from earlier in the article.
You will notice the name is not ‘nextibsubnet.zip’ but InfobloxGetNextAvailableSubnet.zip. The imported zip assumes the name of the vRO Action.
Now the biggest difference between my approach and the VMware way. If you look at the cloned folder you will see a file named ‘getNextAvailableIbSubnet.ps1’. The VMware document called this file ‘handler.ps1’. Instead of putting in ‘handler.handler’ in ‘Entry Handler’, I’ll use ‘getNextAvailableIbSubnet.handler. This tells vRO to look inside ‘getNextAvailableIbSubnet.ps1’ for a function called ‘handler’.
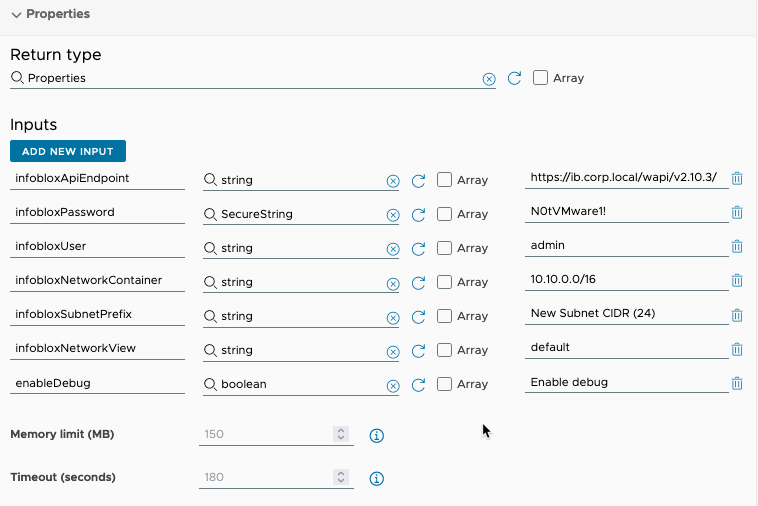
Next we need to change the return type to Properties, and add a few inputs.
Save and run. And if everything is in order, you should get the next InfoBlox subnet from 10.10.0.0/24. The results from the action run.
Just this last week I was updating an old Packer build configuration from JSON to HCL. But for the life of me could not get a new vSphere Windows 2019 machine to find a disk attached to Para Virtualized disk controller.
I repeatedly received this error after the machine new machine booted.
Error
In researching error 0x80042405 in C:\Windows\pather\setuperr.log, I found it simply could not find the attached disk.
setuperr.log
After some research I determined the PVSCSI drivers added to the floppy disk where not being discovered. Or more specifically the new machine didn’t know to search the floppy for additional drivers.
I finally found a configuration section for my autounattend.xml file which would fix it after an almost exhaustive online search.
After adding this section, the new vSphere Windows machine easily found the additional drivers.
This was tested against Windows 2019 in both AWS and vSphere deployments.
The vSphere deployment took an hour, mostly waiting for the updates to be applied. AWS takes significantly less time as I’m using the most recently updated image they provide.
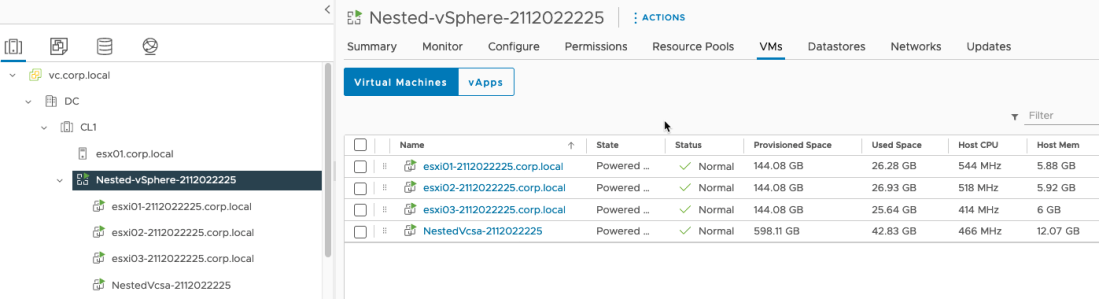
Been a while since my last post. Over the last couple of months I’ve been tinkering with using Code Stream to deploy a Nested Esxi / vCenter environment.
Well let’s just say it’s been an adventure. Much has been learned through trial and (mostly) error.
For example in Williams script, all of the files are located on the workstation where the script runs. Creating a custom docker image with those files would have resulted in a HUGE file, almost 16GB (Nested ESXi appliance, vCSA appliance and supporting files, and NSX-T OVA files). As one of my co-worker says, “Don’t be that guy”.
At first I tried cloning the files into the container as part of the CI setup. Downloading the ESXi OVA worked fine, but failed when I tried copying over the vCSA files. I think it’s just too much.
I finally opted to use a Kubernetes Code Stream instead of a Docker pipeline. This allowed me to use a Persistent Volume Claim.
Kubernetes setup
Some of the steps may lack details, as this has been an ongoing effort and just can’t remember everything. Sorry peeps!
Create two Name Spaces, codestream-proxy and codestream-workspace. Codestream-proxy is used by Code Stream to host a Proxy pod.
Codestream-workspace will host the containers running the pipeline code.
Next came the service account for Code Stream. The path of least resistance was to simply assign ‘cluster-admin’ to the new service account. NOTE: Don’t do this in a production environment.
Next came the Persistent Volume (pv) and Persistent Volume Claim (pvc). My original pv was set to 20GI, which after some testing was determined too small. It was subsequently increased it to 30GI. The larger pv allowed me to retain logs and configurations between runs (for troubleshooting).
The final step in k8s is to get the Service Account token. In this example the SA is called ‘codestream’ (So creative).
k get secret codestream-token-blah!!! -o jsonpath={.data.token} | base64 -d | tr -d "\n"

eyJhbGciOiJSUzI1NiIsImtpZCI6IncxM0hIYTZndS1xcEdFVWR2X1Z4UFNLREdQcGdUWDJOWUF1NDE5YkZzb.........
Copy the token, then head off to Code Stream.
Codestream setup
There I added a Variable to hold the token, called DAG-K8S-Secret.
Then went over to Endpoints, where I added a new Kubernetes endpoint.
Repo setup
The original plan was to download the OVA/OVF files from a repo every time the pipeline ran. However an error would occur on every VCSA file set download. Adding more memory to the container didn’t fix the problem, so I had to go in another direction.
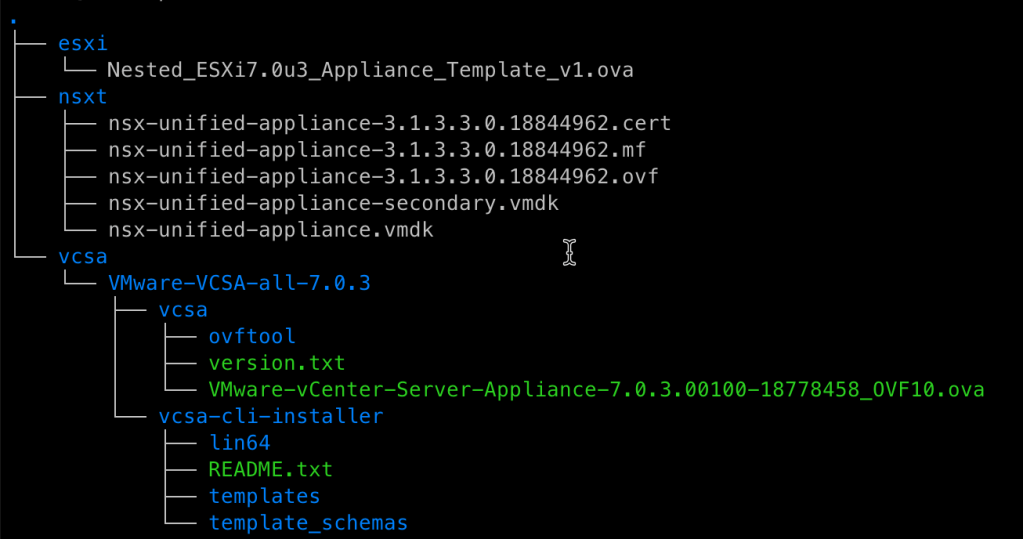
The repo is well connected to the k8s cluster, so the transfer is pretty quick. Here is the directory structure for the repo (http://repo.corp.local/repo/).
NOTE: You will need a valid account to download VCSA and NSX-T.
NOTE: NSX-T will be added to the pipeline later.
Simply copying the files interactively on the k8s node seemed like the next logical step. Yes the files copied over nicely, but any attempt to deploy the VCSA appliance would throw a python error complaining about a missing ‘vmware’ module.
However I was able to run the container manually, copy the files over and run the scripts successfully. Maybe a file permissions issue?
Finally I ran the pipeline with a long sleep at the beginning. Using an interactive session, and copied the files over. This fixed the problem.
Here are the commands I used to copy the files over interactively.
k -n codestream-workspace exec -it po/running-cs-pod-id bash
wget -mxnp -q -nH http://repo.corp.local/repo/ -P /var/workspace_cache/ -R "index.html*"
# /var/workspace_cache is the mount point for the persistent volume
# need to chmod +x a few files to get the vCSA to deploy
chmod +x /var/workspace_cache/repo/vcsa/VMware-VCSA-all-7.0.3/vcsa/ovftool/lin64/ovftool*
chmod +x /var/workspace_cache/repo/vcsa/VMware-VCSA-all-7.0.3/vcsa/vcsa-cli-installer/lin64/vcsa-deploy*
This should do it for now. The next article will cover some of the pipeline details, and some of the changes I had to make to William Lams Powershell code.
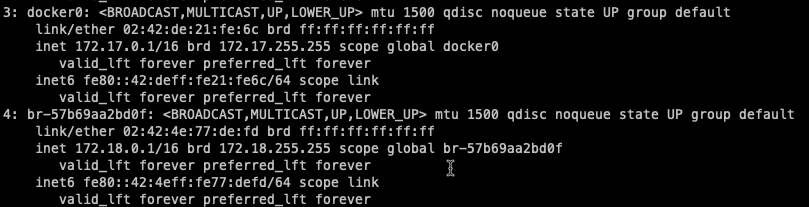
My current customer needs to use 172.18.0.0/16 for their new VMWare Cloud on AWS cluster. However we tried this in the past and were getting a “NO ROUTE TO HOST” error when trying to add the VMC vCenter as a cloud account.
The problem was eventually traced back to the ‘on-prem-collector’ (br-57b69aa2bd0f) network in the Cloud Proxy which also uses the same subnet.
Let’s say the vCenters IP is 172.18.32.10. From inside cloudassembly-sddc-agent container, I try to connect to the vCenter. Eventually getting a ‘No route to host’ error. Can anyone say classic overlapping IP space?
We reached out to our VMWare Customer Success Team and TAM, who eventually provided a way to change the Cloud Proxy docker and on-prem-collector subnets.
Now for the obligatory warning. Don’t try this in production without having GSS sign off on it.
In this example I’m going to change the docker network to 192.168.0.0/24 and the on-prem-collector network to 192.168.1.0/24.
First to update the docker interface range.
Add the following two lines to /etc/docker/daemon.json. Don’t forget to add the necessary comma(s). Then save and close.
Check to see which containers are using this network with docker network inspect on-prem-collector. Mine had two, cloudassembly-sddc-agent, cloudassembly-cmx-agent.
The second task consumes the headers produced by the first task, then GET(s) the Version Information from the vRA Cloud About route (‘/iaas/api/about’). The results are then returned as the vRacAbout (Properties) variable.
function Handler($context, $inputs) {
    <#
    .PARAMETER $inputs.headers (Properties)
        vRAC Refresh Token

    .PARAMETER $inputs.apiEndpoint (String)
        vRAC Base API URL

    .OUTPUT vRacAbout (Properties)
        vRAC version information from the About route

    #>
    $requestUri += $inputs.apiEndpoint + "/iaas/api/about"
    $requestResponse = Invoke-RestMethod -Uri $requestUri -Method Get -Headers $headers

    $output=@{vRacAbout = $requestResponse}

    return $output
}
Here, you can see the output variables for both tasks are populated. Pretty cool.
As you can see, using the vRO Properties type is fairly simple using the PowerShell on CEXP vRO.