vRAC Security Groups revisited

This is follow up to the previous article. A co-worker of mine came up with a better and much cleaner solution.

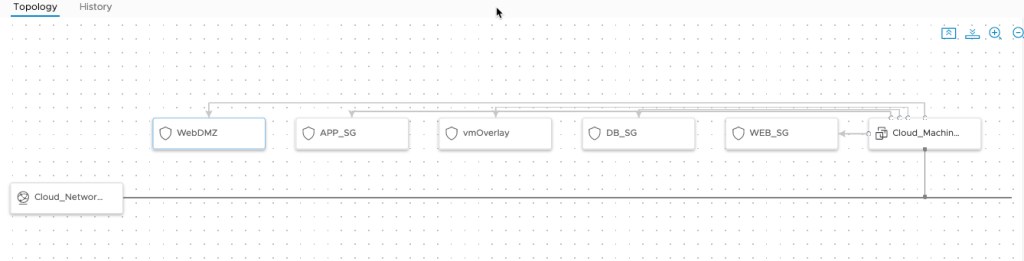
My original solution worked, but introduced a nasty deployment topology diagram.  In effect it showed every SG as attached, even unused ones. This diagram is very misleading and doesn’t reflect the actual assignment of the Security Groups.

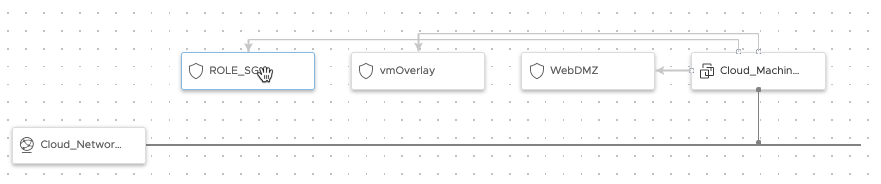
The new solution is much cleaner and more closely represents what the user actually requested.  Here the two mandatory SG’s as well as the required role SG are attached.

The new conceptual code seemed logical, but vRAC just didn’t like it.

formatVersion: 1
inputs:
  extraSG:
    type: string
    title: Select extra SG
    default: nsx:compute_web_sg
    oneOf:
      - title: web
        const: nsx:compute_web_sg
      - title: app
        const: nsx:compute_app_sg
      - title: db
        const: nsx:compute_db_sg
resources:
  ROLE_SG:
    type: Cloud.SecurityGroup
    properties:
      constraints:
        - tag: '${input.extraSG}'
      securityGroupType: existing
  Cloud_Machine_1:
    type: Cloud.Machine
    properties:
      image: RHEL 8 - Encrypted EBS
      flavor: generic.small
      networks:
        - network: '${resource.Cloud_Network_1.id}'
          assignPublicIpAddress: false
          securityGroups:
            - '${resource.ROLE_SG.id}'

After some tinkering I came up the following blueprint.

formatVersion: 1
inputs:
  nsxNetwork:
    type: string
    default: compute
    enum:
      - compute
      - transit
  extraSG:
    type: string
    title: Select extra SG
    default: web
    enum:
      - web
      - app
      - db
resources:
  ROLE_SG:
    type: Cloud.SecurityGroup
    properties:
      name: '${input.extraSG + ''_sg''}'
      constraints:
        - tag: '${''nsx:'' + input.nsxNetwork + ''_'' + input.extraSG + ''_sg''}'
      securityGroupType: existing
  vmOverlay:
    type: Cloud.SecurityGroup
    properties:
      name: NSX Overlay
      constraints:
        - tag: 'nsx:vm-overlay-sg'
      securityGroupType: existing
  WebDMZ:
    type: Cloud.SecurityGroup
    properties:
      name: WebDMZ
      constraints:
        - tag: 'nsx:compute_webdmz'
      securityGroupType: existing
  Cloud_Machine_1:
    type: Cloud.Machine
    properties:
      remoteAccess:
        authentication: keyPairName
        keyPair: id-rsa 
      image: RHEL 8 - Encrypted EBS
      flavor: generic.small
      constraints:
        - tag: 'cloud_type:public'
      tags:
        - key: nsxcloud
          value: trans_ssh
      networks:
        - network: '${resource.Cloud_Network_1.id}'
          assignPublicIpAddress: false
          securityGroups:
            - '${resource.WebDMZ.id}'
            # Adding for NSX Cloud
            - '${resource.vmOverlay.id}'
            # if input.extraSG = "web" then WEB_SG else if imput.extraSG = "app" then APP_DB else DB_SG
            # - '${input.extraSG == "web" ? resource.WEB_SG.id : input.extraSG == "app" ? resource.APP_SG.id : resource.DB_SG.id}'
            - '${resource.ROLE_SG.id}'
  Cloud_Network_1:
    type: Cloud.Network
    properties:
      networkType: existing
      constraints:
        - tag: 'nsx:cloud_compute'

As you can see, there is more than one way to solve use cases with vRAC.  The key sometimes is just to keep trying different options to get the results you want.

vRAC Security Groups lessons learned

A recent vRealize Automation Cloud (vRAC) use case involved applying AWS Security Groups(SG) when deploying a new machine. First, every new AWS machine will be assigned two standard SGs. A third one will be assigned based on the application type (Web, App, DB).

After looking at the Cloud Assembly blueprint expression syntax page, it looked like we would be limited to only two options in our condition (if else). For example, ${input.count < 2 ? "small" : "large"}. Or if input.count < 2 then “small” else “large”.

But we have three options, not two. Effectively we needed.

if (extraSG == 'web' {
then web_sg }
else if (extraSG = 'app' {
then app_sg }
else {
db_sg
}

Or using javascript shorthand.

extraSG == 'web' ? web_sg : extraSG == 'app' ? app_sg : db_sg

Or converted into something vRAC can consume.

${input.extraSG == "web" ? resource.WEB_SG.id : input.extraSG == "app" ? resource.APP_SG.id : resource.DB_SG.id}

Lets see what happens when we deploy this blueprint selecting WEB_SG from the list.

formatVersion: 1
inputs:
  extraSG:
    type: string
    title: Select extra SG
    default: web
    oneOf:
      - title: WEB_SG
        const: web
      - title: APP_SG
        const: app
      - title: DB_SG
        const: db
resources:
  WEB_SG:
    type: Cloud.SecurityGroup
    properties:
      name: WEB_SG
      constraints:
        - tag: 'nsx:compute_web_sg'
      securityGroupType: existing
  APP_SG:
    type: Cloud.SecurityGroup
    properties:
      name: APP_SG
      constraints:
        - tag: 'nsx:compute_app_db'
      securityGroupType: existing
  DB_SG:
    type: Cloud.SecurityGroup
    properties:
      name: DB_SG
      constraints:
        - tag: 'nsx:compute_db_sg'
      securityGroupType: existing
  vmOverlay:
    type: Cloud.SecurityGroup
    properties:
      name: NSX Overlay
      constraints:
        - tag: 'nsx:vm-overlay-sg'
      securityGroupType: existing
  WebDMZ:
    type: Cloud.SecurityGroup
    properties:
      name: WebDMZ
      constraints:
        - tag: 'nsx:compute_webdmz'
      securityGroupType: existing
  Cloud_Machine_1:
    type: Cloud.Machine
    properties:
      remoteAccess:
        authentication: keyPairName
        keyPair: id-rsa
      image: RHEL 8
      flavor: generic.small
      constraints:
        - tag: 'cloud_type:public'
      tags:
        - key: nsxcloud
          value: trans_ssh
      networks:
        - network: '${resource.Cloud_Network_1.id}'
          assignPublicIpAddress: false
          securityGroups:
            - '${resource.WebDMZ.id}'
            # Adding for NSX Cloud
            - '${resource.vmOverlay.id}'
            # if input.extraSG = "web" then WEB_SG else if imput.extraSG = "app" then APP_DB else DB_SG
            - '${input.extraSG == "web" ? resource.WEB_SG.id : input.extraSG == "app" ? resource.APP_SG.id : resource.DB_SG.id}'
  Cloud_Network_1:
    type: Cloud.Network
    properties:
      networkType: existing
      constraints:
        - tag: 'nsx:cloud_compute'

Let’s take a look at the deployment topology from vRAC.

This diagram indicates that all of the SGs where attached to the machine. That can’t be right. I wonder what the machine looks like in AWS.

Hmm, looks like a bug to me.

Now on to leveraging NSX Cloud with vRAC. Stay tuned.

VMware PKS Bosh CLI client SSL trust

This past week or so has been spent deploying VMware PKS Enterprise in my lab.  My main installation guide was provided by Pivotal’s Installing Enterprise PKS on vSphere with NSX-T.  

All was going well until I tried to deploy a cluster.  I could see the machines being deployed in vCenter and various NSX-T components being deployed.  However, the cluster deployment failed with the following error.

Name:                     cluster-03
Plan Name:                small
UUID:                     ad4ba957-35bc-4500-ace8-1cfda0238a83
Last Action:              CREATE
Last Action State:        failed
Last Action Description:  Instance provisioning failed: 
..... task-id: 289, ... result: 2 of 7 pre-start scripts failed. Failed Jobs: ...

As you can see task 289 failed.  Now how the heck do I get the details of the failed task?

The bosh cli client appeared to be the answer. Reading further it looked like I needed to set some environment variables to make it work properly.

After reading a few online documents, I was able to find the Bosh Command Line Credentials (Actually the bosh environment variables) by clicking on the Bosh Tile in Operations Manager, clicking on the Credentials tab, then clicking the link next to Bosh Commandline Credentials.

boshCreds

The provided BOSH_CA_CERT path and file do not exist on my jump machine.  I was able to download the root CA following these steps. (Installing uaac is beyond the scope of this document).

uaac target https://opsman.corp.local/uaa --skip-ssl-validation

uaac token owner getClient ID: opsman
Client secret:
User name: admin
Password: *******

uaac contexts

Copy the admin bearer token from the client_id section (the token is actually called access_token).

[0]*[https://pks.pks.corp.local:8443]

  skip_ssl_validation: true

  ca_cert: root_ca_certificate

  [0]*[admin]

      client_id: admin

      access_token: eyJhbGci .....

      token_type: bearer

Finally downloading the certificate to my jump machine.

curl https://opsman.corp.local/api/v0/security/root_ca_certificate -X GET -H "Authorization: Bearer eyJhbGci ....." -k > root_ca_certificate

My reformatted bosh environment settings, along with the correct path to my certificate ended up like this.

export BOSH_CLIENT=ops_manager 
export BOSH_CLIENT_SECRET=MP0................Blah! 
export BOSH_CA_CERT=/root/root_ca_certificate <--- Correct path and file
export BOSH_ENVIRONMENT=bosh.corp.local

After pasting the variables into my console, I attempted to get the details from the failed task.

bosh task 289 
Validating Director connection config:
  Parsing certificate 1: Missing PEM block
Exit code 1

What the heck?  Apparently the downloaded certificate is actually in JSON format, AND it includes ‘\n’ as line returns.

{"root_ca_certificate_pem":"-----BEGIN CERTIFICATE-----\nMIIDUDCC...
...
....
cQswzKxnm8ZfedoVheV9OBnYQyrHV2ePG/W+kfCoqXD\n ....
CeEzZD6ZicGuv7KcYNP\n...\n-----END CERTIFICATE-----\n"}

Using Notepad ++ I replaced all of the ‘\n’ with a line return.

nppFandR

Then I removed the quotes, brackets , root_ca_certificate.pem section, and deleted all of the other newlines leaving me with a clean certificate (Each line needs to be 64 characters long).

formattedCert

After saving this on my machine, I attempted to run the command again, this time using the –ca-cert option pointing to the new certificate.

bosh task 289 --ca-cert root_ca_2.pem 
Using environment 'bosh.corp.local' as client 'ops_manager'

Task 289
....

Task 289 | 16:58:24 | Updating instance master: master/51431548-e35a-471b-853f-26dc7eca9f7c (0) (canary) (00:02:06)

                    L Error: Action Failed get_task: Task ...
Task 289 | 17:00:30 | Error: Action Failed get_task: ...
Task 289 Started  Wed May  8 16:55:34 UTC 2019
Task 289 Finished Wed May  8 17:00:30 UTC 2019
Task 289 Duration 00:04:56
Task 289 error

Capturing task '289' output:
  Expected task '289' to succeed but state is 'error'
Exit code 1

Success!

Now all all I need to do is figure out the error.  Oh joy!


Migrating from NSX-V to NSX-T Error

The project this week was to convert my lab environment from NSX-V to NSX-T to support some upcoming projects.

Apparently unconfiguring the hosts through the NSX-V interface didn’t work as expected, and in fact didn’t remove all of the NSX-V components.

When trying to install NSX-T (2.3.1) on my vSphere 6.7 hosts, I received the error ‘File path of /etc/vmsyslog.conf.d/dfwpktlogs.conf is claimed by multiple none-overlay VIBS’.

vmsyslogError

After logging into one of the hosts and running ‘esxcli software vib list | grep -i nsx’ I discovered a stray NSX package called esx-nsxv.

#esxcli software vib list | grep -i nsx
esx-nsxv 6.7.0-0.0.7563456 VMware VMwareCertified 2019-03-08

This was quickly rectified by placing the host in maintenance mode, then running the following command.

#esxcli software vib remove -n esx-nsxv

Which spit out the following.

Removal Result
Message: Operation finished successfully.
Reboot Required: false
VIBs Installed:
VIBs Removed: VMware_bootbank_esx-nsxv_6.7.0-0.0.7563456
VIBs Skipped:

After exiting maintenance mode I retried the installation by selecting ‘Resolve’ in NSX-T.

vmsyslogResolve

NSX-T installation on the host then completed successfully.

Nested NSX-T cluster on vSphere 6.7U1

I took some time this week to update William Lams Nested vSphere 6.5 with NSX-T to Nested vSphere 6.7U1/NSX-T 2.3.1, to kickstart a new customer project.

This version updated some of the vCSA OVF JSON fields, and added support for PowerShell 6.1. It was tested against PowerCLI 11.2 on a Windows 10 machine.

The original post can be found at virtuallyghetto.

You can find the new, updated file(s) at nested-nsxt231-vsphere67u1.