

I started using HoloDeck in earnest late last year. The ease of deploying and redeploying VCF 9 environments has been a godsend as I learn some of the new VCF Automation features.
The Holorouter and Webtop were good enough to get started. They were close to the environment, already had useful tools, and saved me from building another machine before I understood what I was trying to reach.
I quickly discovered that neither of the available working environments was particularly well suited to development. I couldn’t install the applications I needed in the Webtop terminal, which made it difficult to work with Kubernetes, perform meaningful development, or even track and save my work with Git.
Using the router OS prompt came with its own risks. For example, don’t even think about installing VCF.PowerCLI—it can break the PowerShell scripts used to deploy HoloDeck.
Then there was the time-consuming process of copying information out of the environment. Whether it was a template, a certificate, or a piece of command output, getting it back to my Mac required a multistep workflow: save it to a text file, SSH into another system, transfer it with SCP, and then retrieve it locally.
The process worked, but it felt like using a filing cabinet to pass a sticky note across the room. To put it mildly, it made about as much sense as putting a screen door on a submarine.

This article keeps things practical. It explains why I built the bastion, how its two network connections work, which routes it uses, and how to connect through it.
The answer was a small Ubuntu bastion host: a normal SSH destination, a place to run the VCF CLI and kubectl, and an SSH SOCKS5 bridge for browser and API access from my Mac.
The addresses below are sanitized examples from a VCFA 9.1 HoloDeck environment. Replace them with the values from your own environment before running commands.

What the bastion is for
The bastion gives me one reliable place to work from:
Mac | | normal SSH, file transfer, and optional SOCKS5 tunnel vUbuntu bastion | | ens34 on VM Network, static management address | | ens37 on Holo-PG-A, static transit routes vHolorouter -> HoloDeck environment
From my Mac, the bastion behaves like an ordinary Linux host. That fixes the copy-and-paste problem immediately. It also gives me a clean home for tools, scripts, temporary certificates, and command history without making the Holorouter or Webtop carry the entire workflow.
The bastion is not a replacement for the Holorouter. It is a carefully placed client of the HoloDeck routing path.

The two network connections
The primary interface connects to the vSphere port group named:
VM Network
For this article, use a static example address in a separate private management network:
192.168.50.10/24
The address is illustrative only. Replace it with an unused address, prefix, gateway, and DNS settings that belong to your own VM Network. Do not use 192.168.50.10/24 blindly, and do not choose a range that overlaps the HoloDeck routes or your local Mac network.
Use this side for ordinary SSH management from the Mac. A static address makes the bastion easier to find after a reboot, but it also makes address management your responsibility. Record the assignment in your normal IPAM or lab notes.
The second interface connects to:
Holo-PG-A
Holo-PG-A is the native VLAN for the site-a HoloDeck environment. This is the internal, Holorouter-facing connection. On the bastion, it appears as ens37 and connects to the following transit network:
10.1.10.128/25
The validated example used:
ens37 address: 10.1.10.229/25Holorouter next hop: 10.1.10.129
The exact address can change. The interface role and next hop are the important parts.

Create the Ubuntu VM
Create a small Ubuntu VM using the normal VCFA or vSphere process for your environment. The bastion does not need to be large for this job; it needs reliable networking and enough disk for tools, logs, and temporary artifacts.
Attach two virtual network adapters:
- The first adapter to
VM Networkfor static management access. - The second adapter to
Holo-PG-Afor HoloDeck transit access.
Install Ubuntu and enable SSH. During the first login, update the system and install the small set of tools used throughout this article:
sudo apt updatesudo apt upgradesudo apt install -y \ curl \ dnsutils \ git \ jq \ netcat-openbsd \ network-manager \ openssh-server
curltests HTTP and HTTPS endpoints.dnsutilsprovides DNS troubleshooting commands such asdigandnslookup. The article usesgetent, which Ubuntu provides separately through the base system.gitprovides version control for scripts and configuration files.jqfilters and formats JSON returned by APIs and command-line tools.netcat-openbsdperforms simple TCP connectivity tests when an application-level request is not appropriate.network-managerprovidesnmcli, which is used to configure the two interfaces and persistent routes.openssh-serverprovides remote shell access, file transfers, and the SOCKS5 tunnel.
Only curl, network-manager, and openssh-server are essential to the connectivity workflow demonstrated here. Git supports the bastion’s development role, while dnsutils, jq, and netcat-openbsd are useful troubleshooting tools. Tools such as the VCF CLI and kubectl can be installed separately when their workflows are introduced.
I opted to use SSH key authentication primarily so I could give a Codex agent secure access to the environment for testing and developing scripts and solutions. That experience is a blog article in its own right—and one I’m looking forward to writing.
Identify the interfaces before adding routes
Ubuntu interface names depend on the image and installation. Do not assume that the management adapter is always ens34 or that the transit adapter is always ens37.
On the bastion, inspect the addresses and connection names:
ip -br addressnmcli device statusnmcli connection show
For the rest of this article, the example assumes:
ens34is connected toVM Networkand uses the static management address.ens37is connected toHolo-PG-Aand uses the static transit address.
If your interface names differ, substitute them consistently.
Configure the management interface
Set the management address according to your local gateway and DNS design. The following is an illustrative NetworkManager example only:
MGMT_CONNECTION="$( nmcli -g GENERAL.CONNECTION device show ens34)"sudo nmcli connection modify \ "${MGMT_CONNECTION}" \ ipv4.method manual \ ipv4.addresses '192.168.50.10/24' \ ipv4.gateway '192.168.50.1' \ ipv4.dns '192.168.50.1'
Replace 192.168.50.1 with the real management gateway and DNS server, or omit the DNS value if your environment supplies name resolution another way. Confirm the management route before applying changes over SSH.
Configure the HoloDeck-facing interface
First identify the NetworkManager connection attached to ens37:
ENS37_CONNECTION="$( nmcli -g GENERAL.CONNECTION device show ens37)"printf 'ens37 connection: %s\n' "${ENS37_CONNECTION}"
Set the transit address and prevent this interface from installing a second default route:
sudo nmcli connection modify \ "${ENS37_CONNECTION}" \ ipv4.method auto \ ipv4.never-default yes
The ipv4.never-default yes setting matters. The bastion should keep its normal management default route on the VM Network interface. The HoloDeck-facing interface needs specific routes, not a competing default route.
Add all of the HoloDeck routes
The route table that matters is the one installed through ens37:
10.1.0.0/16 via 10.1.10.129 dev ens37 proto static metric 10110.1.10.128/25 dev ens37 proto kernel scope link src 10.1.10.229 metric 10110.2.0.0/16 via 10.1.10.129 dev ens37 proto static metric 10110.100.0.0/27 via 10.1.10.129 dev ens37 proto static metric 101
The following output shows the Holorouter interface connected to the same transit network. Its address, 10.1.10.129, becomes the next hop for the bastion’s static routes:
3: eth1: <BROADCAST,MULTICAST,UP,LOWER_UP> mtu 8000 qdisc mq state UP group default qlen 1000 link/ether 00:0c:29:bc:87:9f brd ff:ff:ff:ff:ff:ff altname eno2 altname enp19s0 altname ens224 inet 10.1.10.129/25 scope global eth1 valid_lft forever preferred_lft forever4: eth2: <BROADCAST,MULTICAST> mtu 1500 qdisc noop state DOWN group default qlen 1000
The connected route is created by the interface address. The three static routes reach the wider HoloDeck networks through the Holorouter at 10.1.10.129:
10.1.0.0/16: HoloDeck site-a services and transit networks.10.2.0.0/16: future or current VCFA workload networks.10.100.0.0/27: Supervisor Kubernetes management-plane services in the validated lab.
Preserve any routes already present on the connection. The following example expresses the intended static route set:

sudo nmcli connection modify \ "${ENS37_CONNECTION}" \ ipv4.routes \ "10.1.0.0/16 10.1.10.129 101,10.2.0.0/16 10.1.10.129 101,10.100.0.0/27 10.1.10.129 101"sudo nmcli device reapply ens37
If NetworkManager reports that a reapply is not possible, schedule a controlled connection restart or reboot. Do not casually cycle the only interface you are using for SSH access.
Check route ownership
The route table should make the intended ownership visible:
ip routeip route get 10.100.0.2ip route get 10.2.0.10
The Supervisor example should report a path similar to:
via 10.1.10.129 dev ens37 src 10.1.10.229
The last address is only an example from the 10.2.0.0/16 workload range. Do not treat it as proof that a workload exists. It proves that the route is selected; a real connection is needed to prove the destination path.
Also confirm that the management default route still belongs to the VM Network side:
ip route show default
Validate DNS and vCenter reachability
Test the path from the bastion before involving the Mac browser:
getent ahostsv4 vc-mgmt-a.site-a.vcf.labcurl -skI \ --connect-timeout 5 \ --max-time 15 \ https://vc-mgmt-a.site-a.vcf.lab/
In the validated environment, vCenter returned an HTTPS response through the bastion, confirming that DNS resolution and network connectivity were working. For a trusted final configuration, install the appropriate vCenter CA certificate and repeat the request without -k. The insecure option is useful for isolating routing and certificate issues in a lab, but it should not become part of the permanent configuration.
You can also test connectivity to the Supervisor Kubernetes API server endpoint:
curl -sk \ --connect-timeout 5 \ --max-time 15 \ https://10.100.0.2/version
An authentication response can still prove that the network and TLS endpoint were reached. A timeout points to routing, firewall, or service availability rather than a bad Kubernetes command.
Use SSH normally from the Mac
Connect to the bastion through its static address on VM Network:
ssh ubuntu@<bastion-management-ip>
For repeat use, add a host entry to the Mac’s SSH configuration:
Host holodeck-bastion HostName <bastion-management-ip> User ubuntu IdentityFile ~/.ssh/<bastion-key>
Now copying commands, editing files, and using kubectl feel like normal work again. Files can move directly with scp when needed:
scp ./local-file.txt holodeck-bastion:/tmp/local-file.txtscp holodeck-bastion:/tmp/result.txt ./result.txt
Add a SOCKS5 tunnel when the browser needs the route
SSH can also create a local SOCKS5 listener on the Mac:
ssh -N \ -D 127.0.0.1:1080 \ holodeck-bastion
The listener is bound to localhost, so it is not exposed to the rest of the local network.
Configure Firefox or another browser with:
SOCKS host: 127.0.0.1Port: 1080SOCKS v5: enabledProxy DNS: enabled
Proxy-side DNS is important for names such as vc-mgmt-a.site-a.vcf.lab. Without it, the Mac may try to resolve the internal name locally before the request ever reaches the bastion.
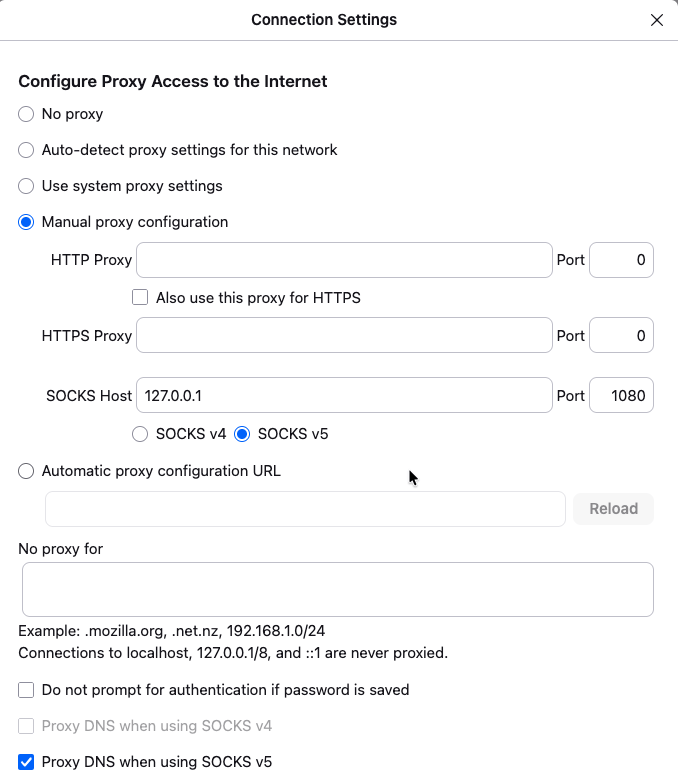
Test the tunnel from the Mac with socks5h, where the h means hostname resolution happens through the proxy:
curl -sk \ --proxy socks5h://127.0.0.1:1080 \ --connect-timeout 5 \ --max-time 15 \ https://vc-mgmt-a.site-a.vcf.lab/
This is the part Webtop never made especially pleasant. The browser stays on the Mac, copy and paste stays on the Mac, and the bastion supplies the route into the HoloDeck environment.

Here is a screenshot of the Firefox tabs on my Mac. As you can see, the SOCKS5 tunnel provides access to several deployed HoloDeck resources.

Why this route is worth keeping
The bastion is deliberately uncomplicated:
- Management arrives through
VM Networkusing a static example address. - HoloDeck traffic leaves through
Holo-PG-Aandens37. - The normal default route remains on the management side.
- Specific HoloDeck networks use the Holorouter next hop.
- SSH provides the working session and file transfer.
- SOCKS5 provides browser and API access when the Mac cannot route directly.
This avoids changing the Holorouter’s VRF behavior, BGP, reverse-path filtering, proxy configuration, or system-wide socket behavior. Those components can remain responsible for the routing they already own.
What the bastion proves, and what it does not
A successful vCenter connectivity test proves that the bastion can resolve the vCenter hostname, route traffic to the destination, and receive an HTTPS response. It does not prove that every HoloDeck service or workload is reachable. Each destination still requires its own connectivity and application-level validation.
Similarly, the persistent 10.2.0.0/16 route proves that the bastion knows where future VCFA workload traffic should go. It does not prove SSH to a real workload until one exists and a connection has been tested.
Once workload access is configured, the same path can provide HTTP or SSH access to deployed machines. For example, the following screenshot shows access to a load-balanced vSphere Pod deployed through VCF Automation. That workflow will be the subject of a future article.
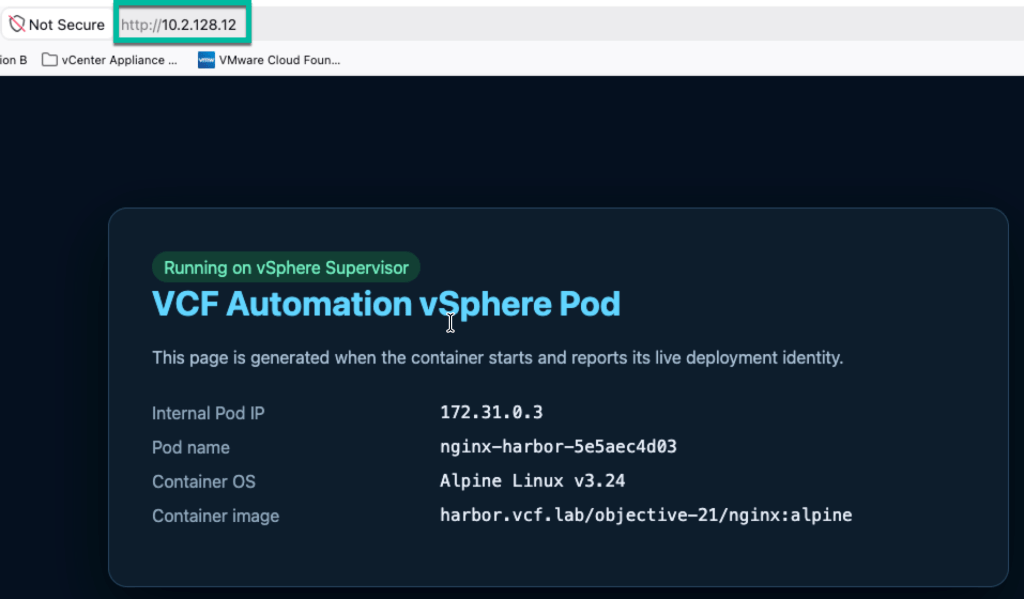
Keeping those evidence boundaries separate is the difference between “the route is configured” and “the application path works.”
Next steps
With the bastion in place, I now have a practical workstation for managing and developing against the HoloDeck environment. It provides a central location for running the VCF CLI, kubectl, diagnostic utilities, and other development tools without modifying the router OS or relying on Webtop’s cumbersome file-transfer process. It also gives me a clean foundation for testing additional services and workflows in future articles.
Disclaimer: Some of the stuff you see here has been checked out, tweaked, or even created by AI. Welcome to the new age, folks!


