A consultant spending most of his time on VMware cloud deployments, integration and orchestration. I waste my spare brain cycles on ham radio, camping, ATVing, and anything that catches my fancy.
First the bad news. The VMware Code Stream Cloud version has a limit of 300 saved Custom Integrations and versions. Your once working pipelines will all of sudden get a validation error of “The saved Custom Integration version is not longer available” if you exceed this limit.
Now the not so good news. They haven’t fixed it yet!
In this blog I’ll explore the new Secret capability in vRealize Automation Cloud. The use case includes the following:
Deploy a CentOS 8 machine
Store the new user password and SSH key in a Secret
Configure the machine using Cloud-Init
Assign the password and SSH key from a vRA Cloud Secret
Verify the password and SSH key assignment.
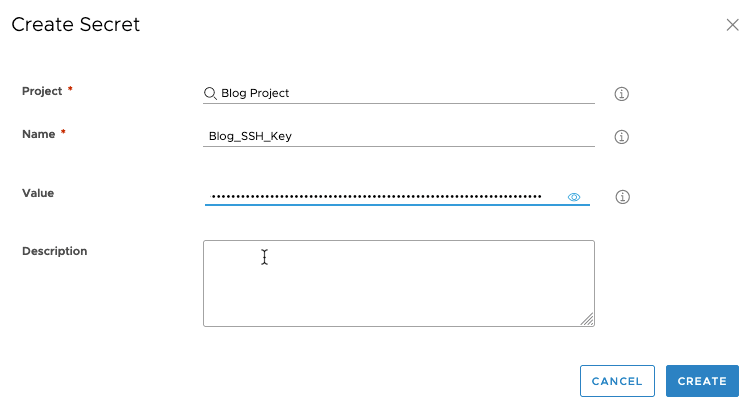
First, add two Secrets. Go to Infrastructure -> Secrets, then click NEW SECRET.
The first one will be the SSH key. Find your project, give it a name, then paste in the key. Click CREATE to save the values. Repeat the process for the Password secret.
The Cloud Template is fairly straight forward. The new user password will be assigned the secret.Blog_Password value, and the ssh_authorized_keys comes from secret.Blog_SSH_Key value.
Now a look at how the secret values are displayed on a deployed machine. Open the deployment, then click on the machine. Expand Cloud Config to view the secret values sent to the machine.
As you can see the values for the new user are encrypted, and do not match stored secret values (The user password is set to VMware1!). Good so far.
Now to see if the password and SSH key actually work. A quick SSH using the key should be sufficient.
Oops. Looks like the key didn’t work, but I was able to login using the password. Time for a bit of troubleshooting. Using elevated permissions (set in Cloud-Init), I take a look at the cloud-init config sent down to the machine.
#more /var/lib/cloud/instance/cloud-config.txt
Hmm, looks the key had a line return in it.
I’ll need to edit/update the Blog_SSH_Key secret. After finding my troublesome secret, I click Edit.
The previously stored value is not viewable, I can only update it.
The new value is viewable until I save it. I made sure this one didn’t have a line return in it. The changes are committed when I click Save.
Now to test the change on a newly deployed machine. I’ll use the same SSH command, with the exception of changing the IP address.
Success! I was able to log in using the key.
In this blog I explored a simple application using two vRA Cloud Secrets, troubleshooting, and updating a secret Value. The VMware developers did a great job. I’m sure the new feature will prove to be very valuable.
I’m not sure when this will get pushed down into vRA 8.x. Please contact your VMware team for more information.
The program “is about giving back to the community beyond your day job”.
One way I give back is by posting new and unique content here once or twice a month. Sometimes a post is simply me clearing a thought before the weekend, completing a commitment to a BU, or documenting something before moving on to another task. It doesn’t take long, but could open the door for one of my peers.
My most frequently used benefit is the vExpert and Cloud Management Slack channels. I normally learn something new every-week. And it sure does feel good to help a peer struggling with something I’ve already tinkered with.
Here’s a list of some of the benefits for receiving the award.
Networking with 2,000+ vExperts / Information Sharing
Knowledge Expansion on VMware & Partner Technology
Opportunity to apply for vExpert BU Lead Subprograms
Possible Job Opportunities
Direct Access to VMware Business Units via Subprograms
Blog Traffic Boost through Advocacy, @vExpert, @VMware, VMware Launch & Announcement Campaigns
1 Year VMware Licenses for Home Labs for almost all Products & Some Partner Products
Private VMware & VMware Partner Sessions
Gifts from VMware and VMware Partners
vExpert Celebration Parties at both VMworld US and VMworld Europe with VMware CEO, Pat Gelsinger
VMware Advocacy Platform Invite (share your content to thousands of vExperts & VMware employees who amplify your content via their social channels)
Private Slack Channels for vExpert and the BU Lead Subprograms
The applications close on January 9th, 2021. Start working on those applications now.
First off, I found the built in Code Stream REST tasks do not have a retry. I learned this the hard way when they had issues with their cloud offering last month. At times it would get a 500 error back when making a request, resulting in a failed execution.
This forced me to look at Python custom integrations which would retry until the correct success code was returned. I was able to get the pipeline working, but it did have a lot of repetitive code, lacked the ability to limit the number of retries, and was based on Python 2.
Seeing the error of my ways, I decided to again refactor the code with a custom module (For the repetitive code), and migrate to Python 3.
The original docker image was CentOS based and did not have Python 3 installed. Instead of just installing Python 3 thus increasing the size of the image, I opted to start with the Docker Official Python 3 image. I’ll get to the build file later.
Now on to the actual refactoring. Here I wanted to combine the reused code into a custom python module. My REST calls include POST (To get a Bearer Token), GET (With and without a Filter), PATCH (To update Image Mappings), and DELETE (To delete the test Image Profile and Cloud Template).
This module snippet includes PostBearerToken_session which returns the bearToken and other headers. GetFilteredVrac_sessions returns a filtered GET request. It also limits the retries to 5 attempts.
import requests
import logging
import os
import json
from requests.adapters import HTTPAdapter
from requests.packages.urllib3.util.retry import Retry

# retry strategy to tolerate API errors.  Will retry if the status_forcelist matches.
retry_strategy = Retry (
    total=5,
    status_forcelist=[429, 500, 502, 503, 504],
    method_whitelist=["GET", "POST"],
    backoff_factor=2,
    raise_on_status=True,
)


adapter = HTTPAdapter(max_retries=retry_strategy)
https = requests.Session()
https.mount("https://", adapter)

vRacUrl = "https://api.mgmt.cloud.vmware.com"

def PostBearerToken_session(refreshToken):
    # Post to get the bearerToken from refreshToken
    # Will return the headers with Authorization populated
    # Build post payload
    pl = {}
    pl['refreshToken'] = refreshToken.replace('\n', '')
    logging.info('payload is ' + json.dumps(pl))
    loginURL = vRacUrl + "/iaas/api/login"
    headers = {
        "Accept": "application/json",
        "Content-Type": "application/json"
        }
    r = https.post(loginURL, json=pl, headers=headers)
    responseJson = r.json()
    token = "Bearer " + responseJson["token"]
    headers['Authorization']=token
    return headers

def GetFilteredVrac_sessions(requestUrl, headers, requestFilter):
    # Get a thing using a filter
    requestUrl = vRacUrl + requestUrl + requestFilter
    print(requestUrl)
    adapter = HTTPAdapter(max_retries=retry_strategy)
    https = requests.Session()
    https.mount("https://", adapter)
    r = https.get(requestUrl, headers=headers)
    responseJson = r.json()
    return responseJson
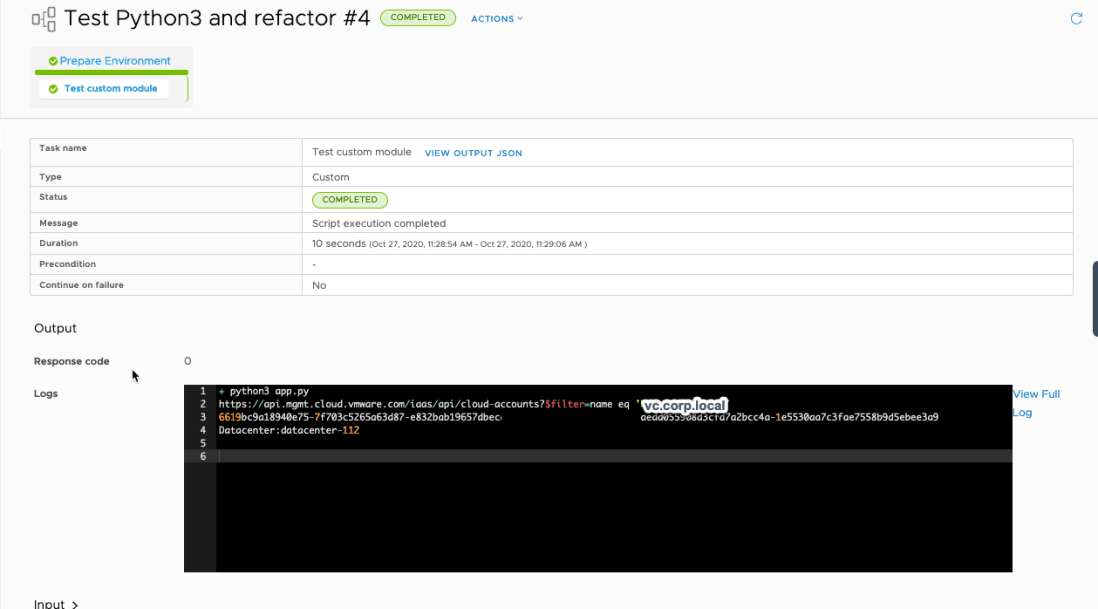
Here is the working Code Stream Custom Integration used to test this module. It will get the headers, then send a filtered request using the Cloud Account Name. It then pulls some information out of the Payload and prints it out. (Sorry for formatting).
 runtime: "python3"
 code: |
   import json
   import requests
   import os
   import sys
   import logging
 # append /build to the path
   # this is where the custom python module is copied to
   sys.path.append('/build')
   import vRAC
 # context.py is automatically added.
   from context import getInput, setOutput
   def main():
def main():
   refreshToken=getInput('RefreshToken')
   # now with new model
   # authHeaders will have all of the required headers, including the bearerToken
   authHeaders=vRAC.PostBearerToken_session(refreshToken)
   # test the getFunction with filter
   requestUrl = "/iaas/api/cloud-accounts"
   requestFilter = "?$filter=name eq '" + getInput('cloudAccountName') + "'"
   # get the cloudAccount by name
   cloudAccountJson=vRAC.GetFilteredVrac_sessions(requestUrl, authHeaders, requestFilter)
   # get some specific data out for later
   cloudAccountId = cloudAccountJson['content'][0]['id']
   logging.info('cloudAccountId: ' + cloudAccountId)
 if name == 'main':
       main()
 inputProperties:      # Enter fields for input section of a task
   # Password input
 - name: RefreshToken
   type: text
   title: vRAC Refresh Token
   placeHolder: 'secret/password field'
   defaultValue: changeMe
   required: true
   bindable: true
   labelMessage: vRAC RefreshToken

 - name: cloudAccountName
   type: text
   title: Cloud Account Name
   placeHolder: vc.corp.local
   defaultValue: vc.corp.local
   required: true
   bindable: true
   labelMessage: Cloud Account Name
Next the new Docker image. This uses the official Python 3 image as a starting point. The build file copies everything over (Including the custom module and requirements.txt), then installs ‘requests’.
FROM python:3

WORKDIR /build

COPY . ./
RUN pip install --no-cache-dir -r requirements.txt
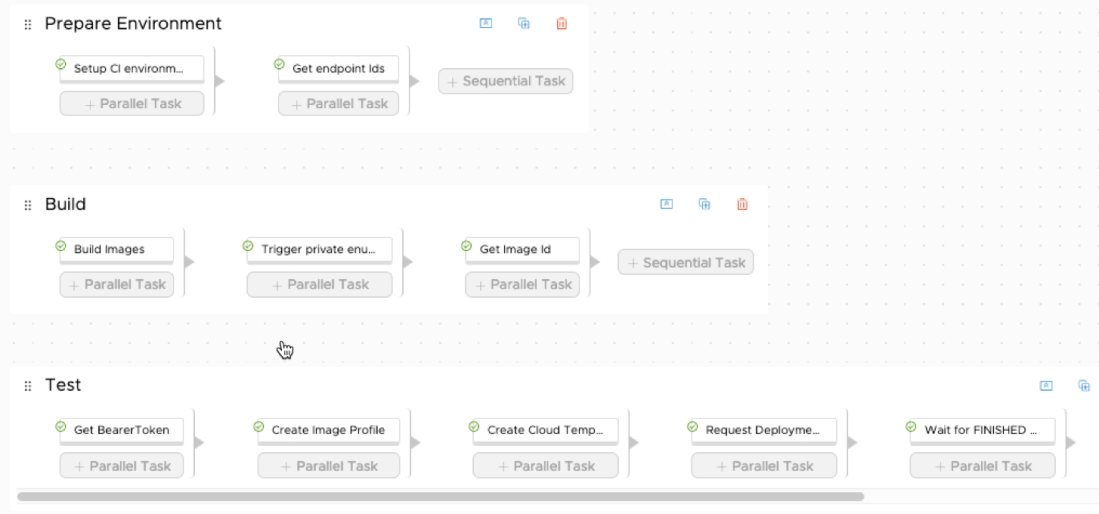
Now that the frame work is ready, it’s time to create the pipeline and test it. This is well documented here Creating and using pipelines in VMware Code Stream. Update the Host field with your predefined Docker Host, set the Builder image URL (Docker Hub repo and tag), and set the Working directory to ‘/build’ (to match WORKDIR in the Dockerfile).
Running the pipeline worked and returned the requested information.
This was a fairly brief article. I really just wanted to get everything written down before the weekend. I’ll have more in the near future.
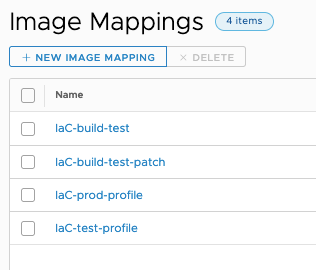
First off, the Image Mappings shown in the UI cannot be updated via the API directly. The API allows you create, change and delete Image Profiles. An Image Profile contains the Image Mappings and is tied to a Region.
For example, in this image the IaC Image Mappings are displayed.
Here, some of same Image Mappings as seen when you GET the Image Profile by id.
{
"imageMapping": {
"mapping": {
"IaC-build-test-patch": {
"id": "8fc331632163f53fd0c66e0407495504295b4c1c",
"name": "",
"description": "Template: vSphere-CentOS8-CUSTOM-2020.09.25.181019"
},
"IaC-prod-profile": {
"id": "2e2d31be93c59531d2c1eeeadc58f68b66174559",
"name": "",
"description": "Template: vSphere-CentOS8-CUSTOM-2020.09.25.144314"
},
"IaC-test-profile": {
"id": "842c91f05185978d62d201df3b47d1505cf3fea3",
"name": "",
"description": "Generic CentOS 7 template with cloud-init installed and VM hardware version 13 (compatible with ESXi 6.5 or greater)."
}
}
},
"regionId": "71cecc477594a67558b9d5xxxxxxx",
"name": "IaC-build-test-profile",
"description": "Packer build image for testing"
}
But how do you get the Image Profile Id? I ended up using a filter based on the externalRegionId (I used another filtered search to find the externalRegionId by Region Name).
Then using cloudAccountJson returned previously, I built a new body using the following (partial) code (I couldn’t get the formatting right, hence the image.)
Now some gotcha’s.
First, remember that the image mappings are tied to the region. You will loose any Image Mappings NOT included in the POST/PATCH Body. Make sure you back up the Image Profile settings (Do a get by Image Profile Id) before attempting to change the mappings via the API.
Secondly, an Image Profile does not have a name by default. You need to set this via the API. Why would you need it? Well you may want to find the Image Profile by name later. My current customer creates new customer Image Profiles via the API and uses a ‘tag’ like naming convention.
Thirdly, I’ve experienced several 500 errors when interfacing with the vRA Cloud API. The out of box Code Stream REST tasks do not retry. I ended up writing python custom integrations as a work around. These retry until receiving the correct response code (I’ve seen up to 15 500 errors before getting a 200).
This is just one thing I’ve learned about the vRA Cloud API, and Code Stream. I’ll post more as I have time.
I’ve been anxiously waiting for the new Terraform Resources for vRealize Automation Cloud. Well the wait is finally over. Version 8.20 was released on 8/30/2020. You can view the Release Notes here.
Now why would you want to use Terraform in vRA Cloud? You can already do a bunch out of the box. But what if you wanted to deploy an AWS EC2 instance with an encrypted boot disk? That is not available.
Terraform to the rescue. You can use Terraform to fill those kind of gaps without using a vRealize Orchestrator or Extensibility Appliance.
In this article I’ll show you how to deploy a basic AWS EC2 instance with an encrypted boot disk using the new Terraform Resource.
The Terraform configuration files and blueprint are available here.
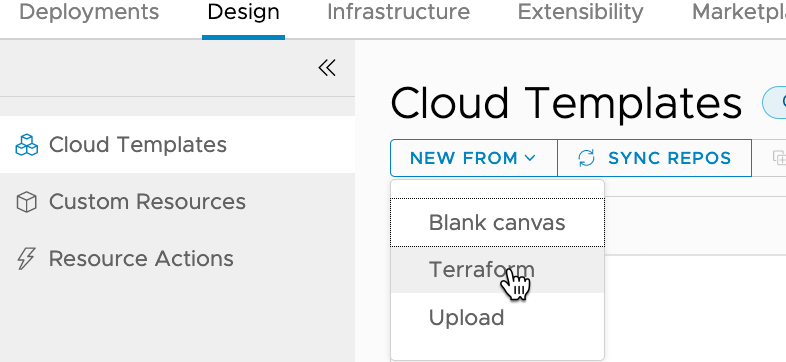
Now on to the good stuff. Within vRAC create a new Cloud Template (renamed from Blueprints), by clicking on Design -> NEW FROM -> Terraform.
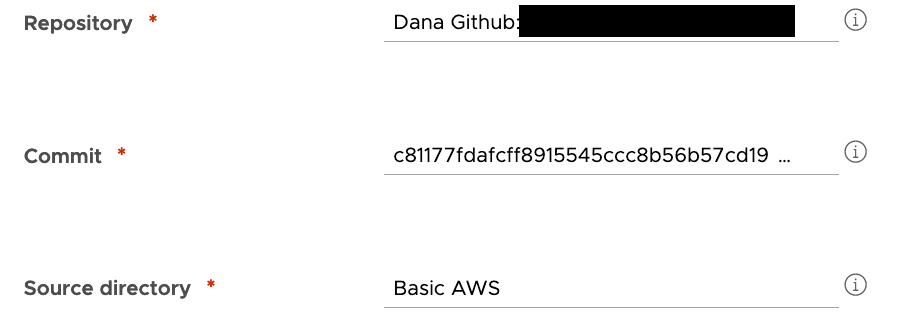
Enter the Template name and project on the next page, then click Next. The next page is where you select your GitHub Repository, Commit and the Source Directory. Then click Next.
For this example I’m leaving all of the variables as they come from variables.tf in the source directory. Click Next. This will bring you to the designer page.
The code will look something like this, with one notable exception depending on how your repo’s directory structure is laid out. The wizard assumes your sourceDirectory is directly off the root. For example root/sourceDirectory. But what if you have a path that looks like root/terraform/sourceDirectory? The wizard will not add ‘/terraform’ automagically. You will need to fix it (sample is already fixed).
inputs:
  region:
    type: string
    default: us-east-2
  ssh_key_name:
    type: string
    default: changeMe
  hostname:
    type: string
    default: changeMe
resources:
  terraform:
    type: Cloud.Terraform.Configuration
    properties:
      variables:
        region: '${input.region}'
        ssh_key_name: '${input.ssh_key_name}'
        hostname: '${input.hostname}'
      providers:
        - name: aws
          # List of available cloud zones: Will get populated during create from
          cloudZone: *********
      terraformVersion: 0.12.26
      configurationSource:
        repositoryId: XXXXXXXXX
        commitId: XXXXXXXXX
        sourceDirectory: /terraform/Basic AWS
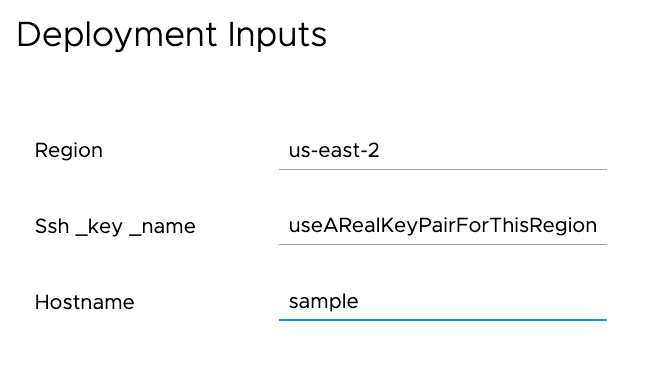
If all goes as expected, you can now deploy the new template.
Make sure to change the default variable values to match your environment. The Ssh_key_name needs to exist in the region you are deploying into.
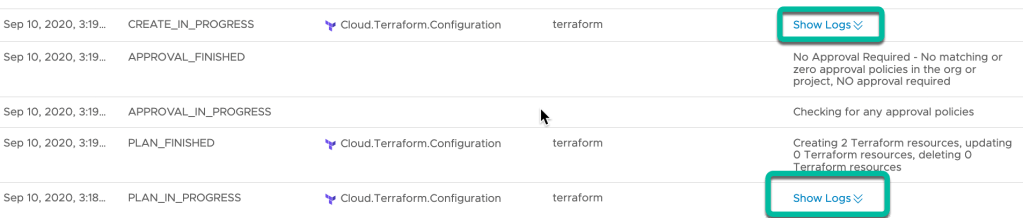
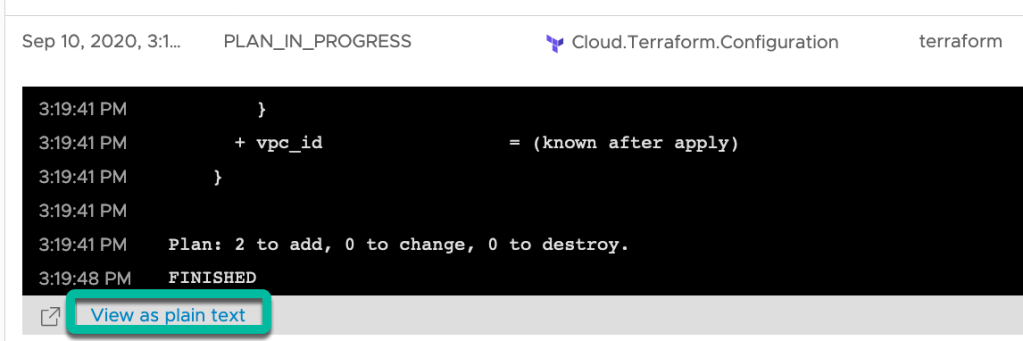
Click on the Deployment History to see the Terraform Plan and Apply logs. They can be viewed by clicking ‘Show Logs” on the PLAN_IN_PROGRESS or CREATE_IN_PROGRESS status lines.
The logs can also be viewed in a new browser tab by clicking on ‘View as plain text’ from the expanded ‘Show Logs’ window.
Hopefully the instance deployed correctly. If so, take a coffee break. This gives vRAC time to discover the new ‘aws_instance’ and enable some day 2 actions.
The day 2 actions vary depending on the deployed machine type. You can find more information on page 416 of the Using and Managing VMware Cloud Assembly documentation.
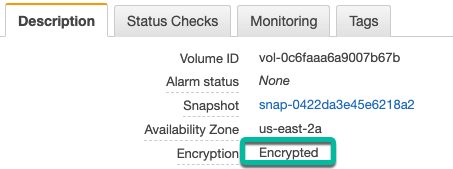
But did the boot disk actually get encrypted? Yes! Here is a screenshot of the boot volume.
As you can see, the new Terraform Resource is a great way to fill in vRAC deployment gaps without using extensibility.
One of the common use cases I see is having the ability to optionally add disks to a machine in vRealize Automation Cloud.
For example, one requester may just want a basic machine with just the OS disk, while another may want several to support SQL Server.
In this article I’ll show you how to add up to four additional disks using an undocumented vRA Cloud function. The other available functions are listed on this VMware documentation page.
Now down to details. What we need to do is create some property bindings for the optional disks, then attach them to the machine using ‘map_to_object’. The grey dashed lines indicate an implicit or property binding in the canvas. Additional information about this kind of bind is available at this VMware documentation page.
Implicit or property bindings
Four inputs are needed, one for each disk. Each disk that is NOT zero size will be created for the machine.
formatVersion: 1
name: Optional disks
version: 1
inputs:
  hostname:
    type: string
    default: changeme
    description: Desired hostname
  password:
    type: string
    encrypted: true
    default: Password1234@$
    description: Desired password for the local administrator
  ipAddress:
    type: string
    default: 10.10.10.10
    description: Desired IP Address
  disk1Size:
    type: integer
    default: 5
    description: A SIZE of 0 will disable the disk and it will not be provisioned.
  disk2Size:
    type: integer
    default: 10
    description: A SIZE of 0 will disable the disk and it will not be provisioned.
  disk3Size:
    type: integer
    default: 15
    description: A SIZE of 0 will disable the disk and it will not be provisioned.
  disk4Size:
    type: integer
    default: 20
    description: A SIZE of 0 will disable the disk and it will not be provisioned.
resources:
  Cloud_Machine_1:
    type: Cloud.Machine
    properties:
      name: '${input.hostname}'
      image: Windows 2019
      flavor: generic.medium
      remoteAccess:
        authentication: usernamePassword
        username: Administrator
        password: '${input.password}'
      resourceGroupName: '${env.projectName}'
      attachedDisks: '${map_to_object(resource.Cloud_Volume_1[*].id + resource.Cloud_Volume_2[*].id + resource.Cloud_Volume_3[*].id + resource.Cloud_Volume_4[*].id, "source")}'
      networks:
        - network: '${resource.Cloud_Network_1.id}'
          assignment: static
          address: '${input.ipAddress}'
  Cloud_Volume_1:
    type: Cloud.Volume
    properties:
      count: '${input.disk1Size == 0 ? 0 : 1 }'
      capacityGb: '${input.disk1Size}'
  Cloud_Network_1:
    type: Cloud.Network
    properties:
      networkType: existing
      constraints:
        - tag: 'network:vsanready_vlan_14'
  Cloud_Volume_2:
    type: Cloud.Volume
    properties:
      count: '${input.disk2Size == 0 ? 0 : 1}'
      capacityGb: '${input.disk2Size}'
  Cloud_Volume_3:
    type: Cloud.Volume
    properties:
      count: '${input.disk3Size == 0 ? 0 : 1 }'
      capacityGb: '${input.disk3Size}'
  Cloud_Volume_4:
    type: Cloud.Volume
    properties:
      count: '${input.disk4Size == 0 ? 0 : 1}'
      capacityGb: '${input.disk4Size}'
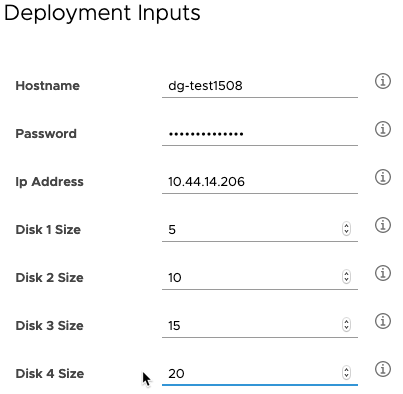
Now to test it. I’ll deploy a machine with four additional disks. Here is the request form with the default disk sizes.
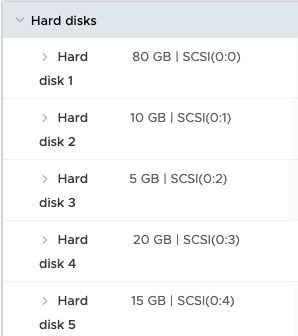
After deploying the machines, you may find the disks did not get added in order. This is known issue. The offshore developers told me ordered addition of disks is not supported at this point (July 2020). Here is a screen shot of the deployed machines. Notice the order, they are not the same as my request.
Out of order disks
In mid July 2020 they released a new vRA Cloud version with additional data for the block-devices. At the time writing this article, the new properties were not included in the block-device model in the API documentation.
As you can see they provide the controller number (controllerKey), unit number (controllerUnitNumber), and the provider generated unique identifier (providerUniqueIdentifier).
The idea was to provide this information for those organizations wishing to reorder the disks or even move them to new disk controllers to support their various server deployments.
These additional properties may make into the next version of vRA 8. But who knows what makes the cut.
The midyear vExpert Applications are open until June 25th, 5 PM PDT.
What the heck is vExpert you may ask? The VMware vExpert program is VMware’s global evangelism and advocacy program.
The award is for individuals who are sharing their VMware knowledge and contributing that back to their community.
How do you do that? Writing blog articles, participating in discussions on VMware Code (Slack), presenting at VMUG’s, etc.
What is in it for you? Promotion of your articles, exposure at global events, co-op advertising, traffic analysis, and early access to beta programs and VMware’s roadmap.
Other vExpert Program Benefits
Invite to the private #Slack channel
vExpert certificate signed by CEO Pat Gelsinger.
Private forums on communities.vmware.com.
Permission to use the vExpert logo on cards, website, etc for one year
Access to a private directory for networking, etc.
Exclusive gifts from various VMware partners.
Private webinars with VMware partners as well as NFRs.
Access to private betas (subject to admission by beta teams).
365-day eval licenses for most products for home lab / cloud providers.
Private pre-launch briefings via our blogger briefing pre-VMworld (subject to admission by product teams)
Blogger early access program for vSphere and some other products.
Featured in a public vExpert online directory.
Access to vetted VMware & Virtualization content for your social channels.
Yearly vExpert parties at both VMworld US and VMworld Europe events.
Identification as a vExpert at both VMworld US and VMworld EU.
The application process is pretty simple, just visit the vExpert site, create and submit your application.
Don’t forget, the midyear applications close at 5PM PDT June 25th 2020.
The current implementation of vRealize Automation Cloud and Git integration for Blueprint is read only. Meaning you download the new Blueprint version into a local repo the push it. After a few minutes vRA Cloud will see the new version and update the design page. It’s really a pain if you know what I mean.
What I really wanted was to automatically push the new or updated Blueprint when a new version is created.
The following details one potential solution using vRA Cloud ABX actions in a flow on Lambda.
The flow consists of three parts.
Retrieve a vRA Cloud refresh token from an AWS Systems Manager Parameter, then get a refresh token (get_bearer_token_AWS). It returns the bearer token as ‘bearer_token’.
Get Blueprint Version Content. This uses ‘bearer_token’ to get the new Blueprint Version payload and return it as ‘bp_version_content’.
Then Add or Update Blueprint on Github. This action converts the ‘bp_version_content’ from JSON into YAML. It also adds or updates the two required properties, ‘name’ and ‘version’. Both values come from the content retrieved from step two. It also clones the repo, checks to see if the blueprint exists. Then it either creates a Blueprint folder with blueprint.yaml, or updates an existing blueprint.yaml.
The vRA Cloud Refresh Token and Github API key are stored in an AWS SSM Parameter. Please take a look at one of my previous articles on how to set this up.
‘get_bearer_token_AWS’ has two inputs. region_name is the AWS region, and refreshToken is the SSM Parameter containing the vRA Cloud refresh token.
Action 2 (Blueprint Version Content) uses the bearer token returned by Action 1 to get the blueprint version content.
The final action, consumes the blueprint content returned by action 2. It has three inputs, githubRepo is the repo configured in your github project, githubToken is the SSM Parameter holding the Github key, and finally region_name is the AWS region where the Parameter is configured.
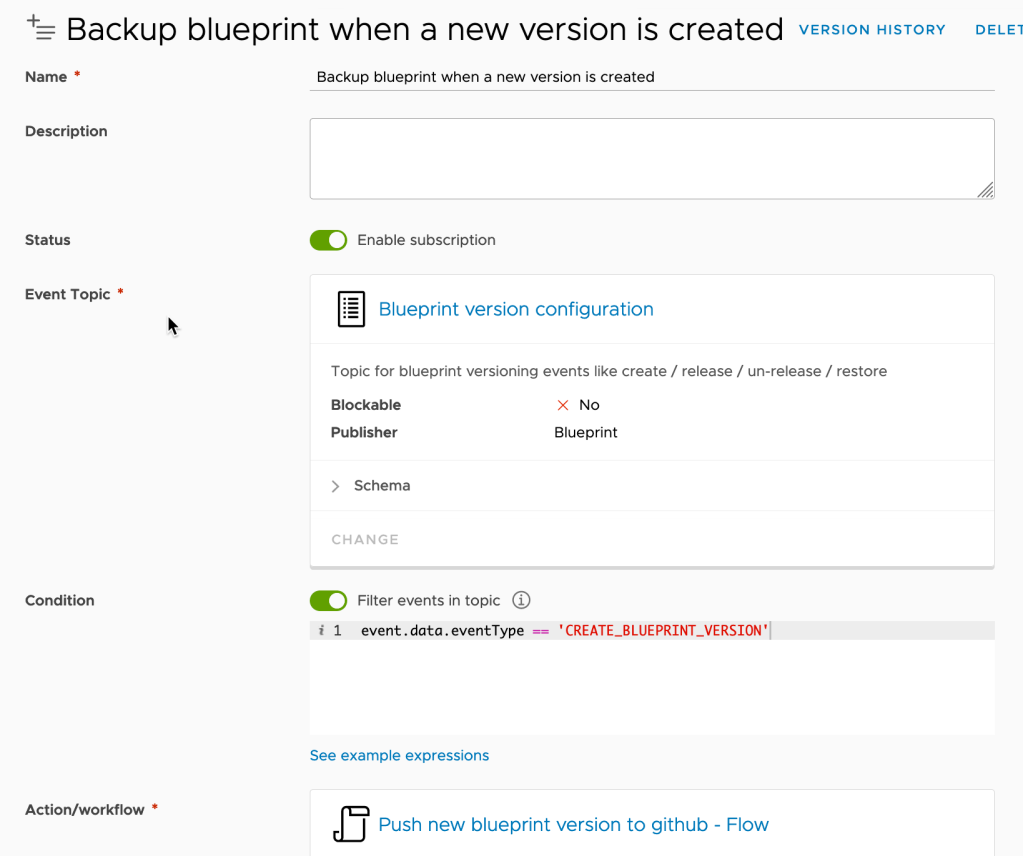
Create a new Blueprint version configuration subscription, using the flow as the target action, and filtering the event to “‘event.data.eventType == ‘CREATE_BLUEPRINT_VERSION'”.
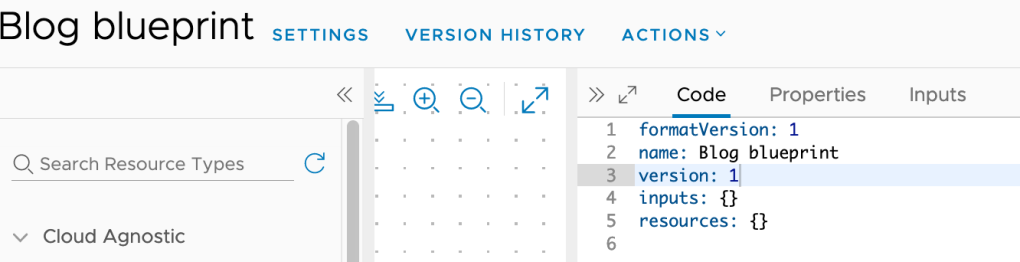
Now to test the solution. Here I have a very basic blueprint. Make sure you add the name and version properties. The name value should match the actual blueprint name. Now create a new Version. Then wait until Github does another inventory.
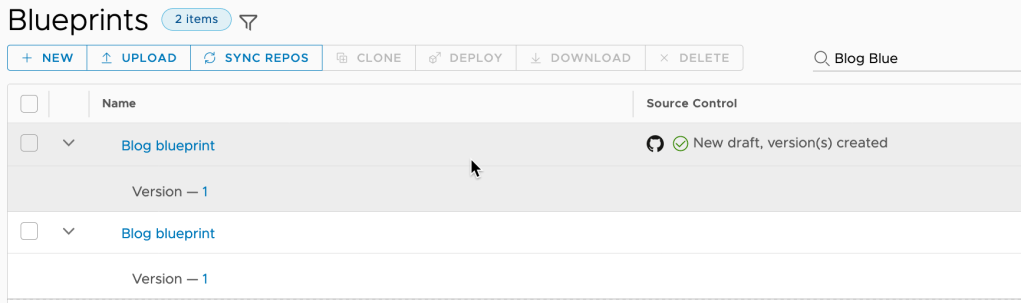
You may notice the versioned Blueprint will show up a second time, now being managed by Github. I think vRA Cloud is adding the discovered blueprints on Github with a new Blueprint ID. The fix is pretty easy, just delete the original blueprint after making sure the imported one still works.
The flow bundle containing all of the actions is available in this repository.
One common integration use case is to securely store passwords and tokens. In this article I’ll show you how to recover and decrypt an AWS Systems Manager (SSM) Parameter (vRAC Cloud Refresh Token), make a vRA Cloud API call to claim a bearer token, and finally return the deployment name from a second vRA Cloud API call.
I’m not going to discuss how to get the API Token. Detailed instructions are available in this VMware Blog.
I’ll store this token in an AWS SSM Parameter called VRAC_REFRESH_TOKEN as a secure string. Again this is really beyond the scope of this article. Please refer to AWS Systems Manager Parameter Store page for more information.
The following action will need access to this new Parameter. Here I’m creating a new role named blog-ssm-sample-role. I used an inline policy to allow access to every Parameter using these settings.
You will most likely want to be more granular in a production environment. This role will also need the AWSLambdaBasicExecutionRole.
Now to start building the python ABX Action. This action uses two Default inputs, region_name and refreshToken. Then add requests and boto3 as dependancies. SSM is only available on AWS, so the FaaS Provider is set to Amazon Web Services. And finally set the IAM role to my sample role.
And now the function. It will grab the refresh token from the Parameter store, get a vRA bearer token, get the deployment name, which is returned when the function completes.
import json
import logging
import requests
import boto3
logger = logging.getLogger()
logger.setLevel(logging.INFO)
VRAC_API_URL = "https://api.mgmt.cloud.vmware.com"
def handler(context, inputs):
'''
Get secrets
'''
vrac_refresh_token = get_secrets(inputs['region_name'],inputs['refreshToken'])
'''
get vRAC bearer_token
work around as the context does not contain auth information for this event
context.request is responding with Not authenticated
'''
bearer_token = get_vrac_bearer_token(vrac_refresh_token)
'''
Get the deployment name using deploymentId from inputs
'''
deployment_name = get_deployment_name(inputs,bearer_token)
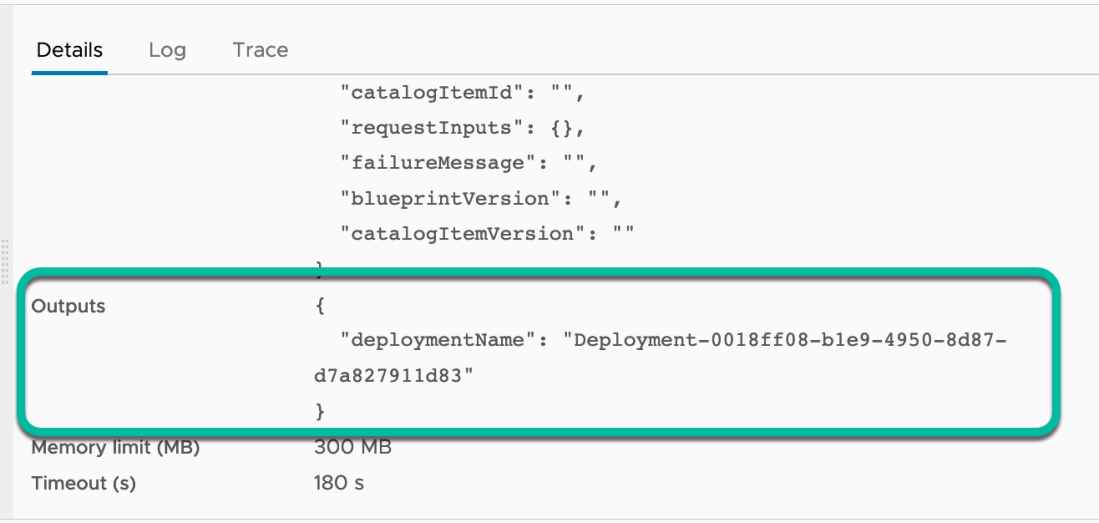
outputs = {}
outputs['deploymentName'] = deployment_name
return outputs
def get_secrets(region,ssm_parameter):
# Create a Secrets Manager client
session = boto3.session.Session()
ssm = session.client(
service_name='ssm',
region_name=region)
parameterSecret = ssm.get_parameter(Name=ssm_parameter, WithDecryption=True)
return parameterSecret['Parameter']['Value']
def get_deployment_name(inputs, bearer_token):
url = VRAC_API_URL + "/deployment/api/deployments/" + inputs['deploymentId']
headers = {"Authorization": "Bearer " + bearer_token}
result = requests.get(url = url, headers=headers)
#logging.info(result)
result_data = result.json()
deployment_name = result_data["name"]
logging.info("### deployment name is %s ", deployment_name)
return deployment_name
def get_vrac_bearer_token(vrac_refresh_token):
url = VRAC_API_URL + "/iaas/api/login"
payload = { "refreshToken": vrac_refresh_token }
result = requests.post(url = url, json = payload)
result_data = result.json()
bearer_token = result_data["token"]
return bearer_token
Next request a new deployment, waiting until it completes. Then check the Action Run under Extensibility -> Action Runs. If all went as expected you should see the deployment name in the Details -> Outputs section.
This simple use case allows vRA Cloud ABX to recover and use secure data stored in an AWS SSM Parameter.