
VCF Automation 9 presents some unique challenges for those of us who grew up with the old Aria Automation model. Change is ever present, though, so this old grumpy guy is learning the new model one practical lesson at a time.
For me, that learning starts with All Apps Organizations and Kubernetes-backed workloads. They are a different way to think about application delivery, and I have found that the quickest way to understand them is to deploy something small, observe what the platform does, and follow the evidence when it does not work as expected.
Today we are going to deploy a vSphere Pod in my VCF 9.1 environment. I will share what I tested, the capacity issue I encountered, and how I exposed the finished workload through a load balancer. Consider this a starting point for the lessons that follow, not a claim that the learning is finished.
Now, on to business.
Before we start clicking buttons, here is the shape of the experiment. We are going to create an All Apps Organization, create a namespace inside its default project, deploy a very small Nginx container, and then expose it through a load balancer. The point is not to build an exciting website. The point is to see which pieces of the platform have to agree before a vSphere Pod can run.
There are three ideas worth keeping in mind as we go. First, a vSphere Pod is a Kubernetes Pod managed by Supervisor, not a vSphere vApp. Second, the namespace carries more responsibility than its name suggests: it is tied to access, capacity, and networking. Third, a successful form submission is only the beginning of the evidence. We still need to see the instance become Ready and reach it from a client network.
We’ll start with a brand new VCF 9 deployment, either real or Holodeck. We’ll use a new All Apps Organization configured with the default settings. Your menu names and available options may vary slightly by release, but the sequence is the important part.
Now let’s see what happens when you try to deploy a pod in the default project called ‘default-project’.
First add a new namespace. Within the project, click Projects -> default-project -> Namespaces -> New. Wait for the namespace to become Active before moving on. That state is not just decorative: it tells us that VCFA has finished creating the namespace and its supporting configuration.
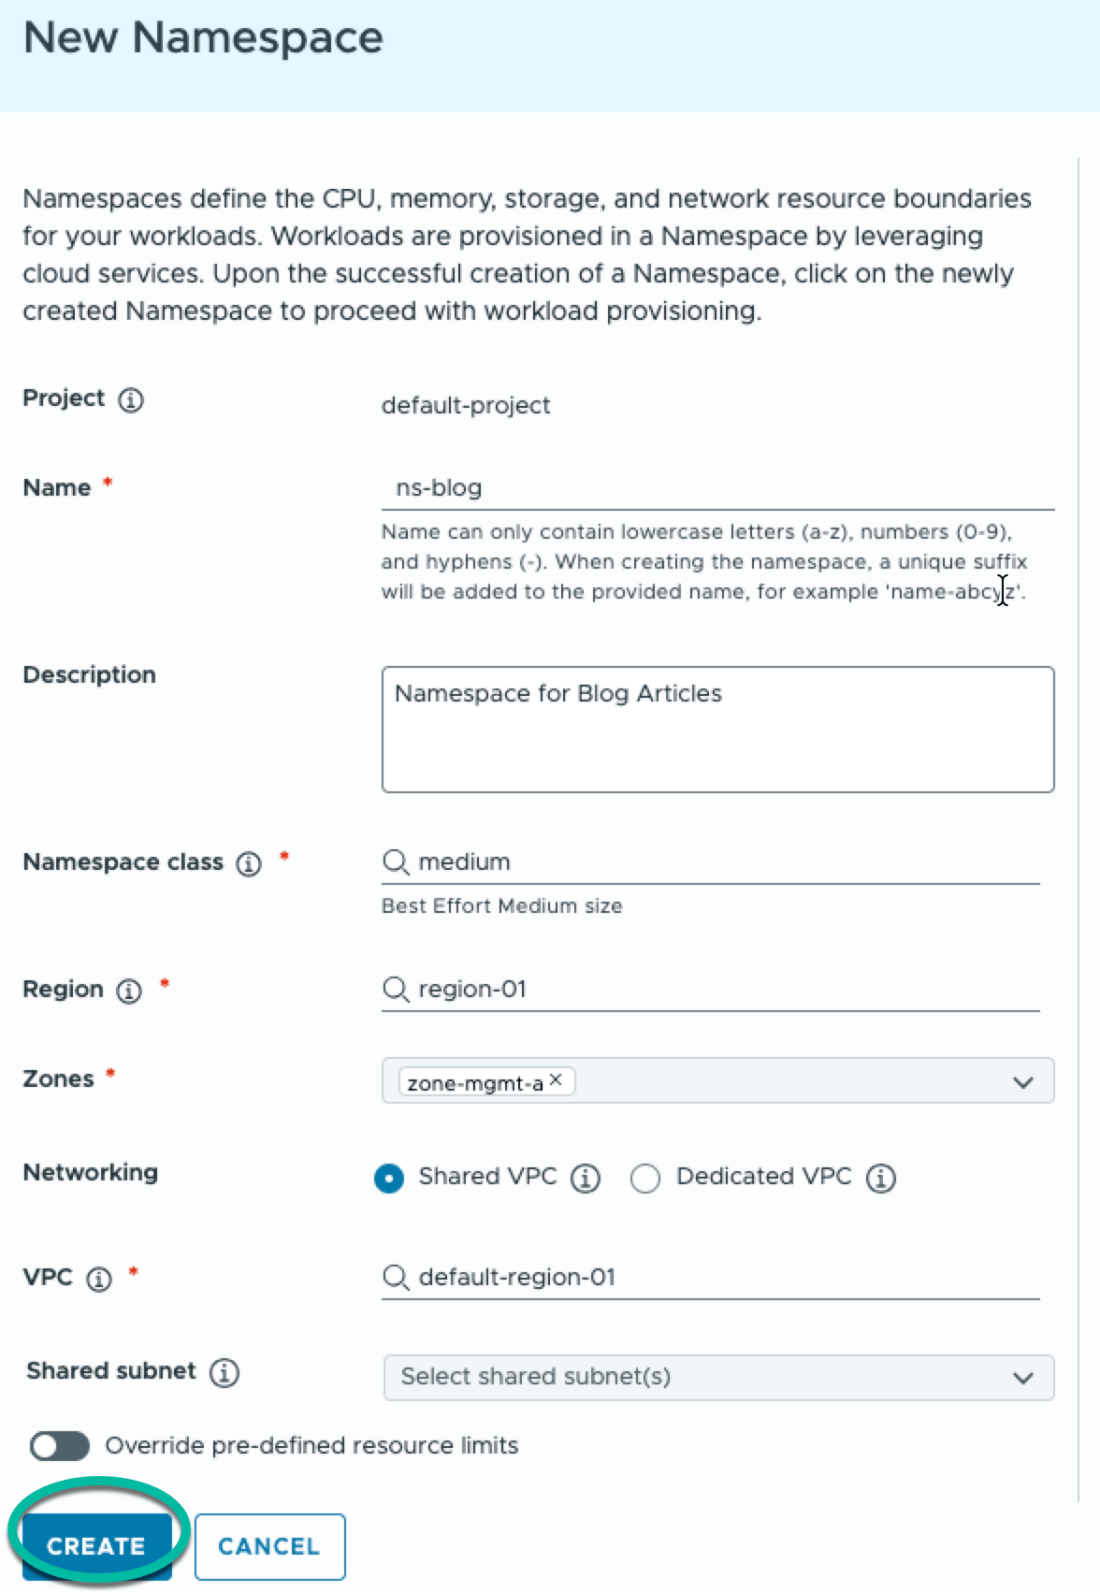
In my Holodeck environment, the namespace was created as ns-blog-2xtdh. After it became Active, I moved on to attempting to deploy a Pod. At this stage, nothing has contacted Harbor and no container has started. We have only established the place where the workload is allowed to live.
Under Build & Deploy, click Select a namespace. After selecting the namespace, you’ll see several resource options. The one in question is Container. Select that and click CREATE NEW INSTANCE.
And now we meet the first useful clue: a yellow warning. This is the point where it is tempting to assume that the new Organization must be broken. It is new, after all. Surely there cannot already be a capacity problem in an empty Organization.

But read the warning closely. It says Insufficient resource reservation. This is not an image-pull error, a Kubernetes application error, or a Harbor error. The platform is telling us that it cannot reserve enough underlying vSphere capacity for the PodVM.
This distinction matters. A container request is eventually backed by vSphere resources, and VCFA checks those resources before the Pod is scheduled. If the request cannot be admitted, the platform never reaches the point where it could pull an image. Changing a registry password at this stage would be a wonderfully energetic way to solve the wrong problem.
Let’s get that fixed. Go back to the namespace through Manage & Govern -> Namespaces, and edit the namespace we just created. There are two related places to inspect: the Organization’s Region Quota and the namespace’s own resource limits.
In the Provider Management Portal, select the Organization and open Region Quota. Then click Edit Reservation next to the relevant Zone. This was the first part that took me a while to find. The setting is not hiding in the container request, because it belongs to the provider and Organization capacity model.
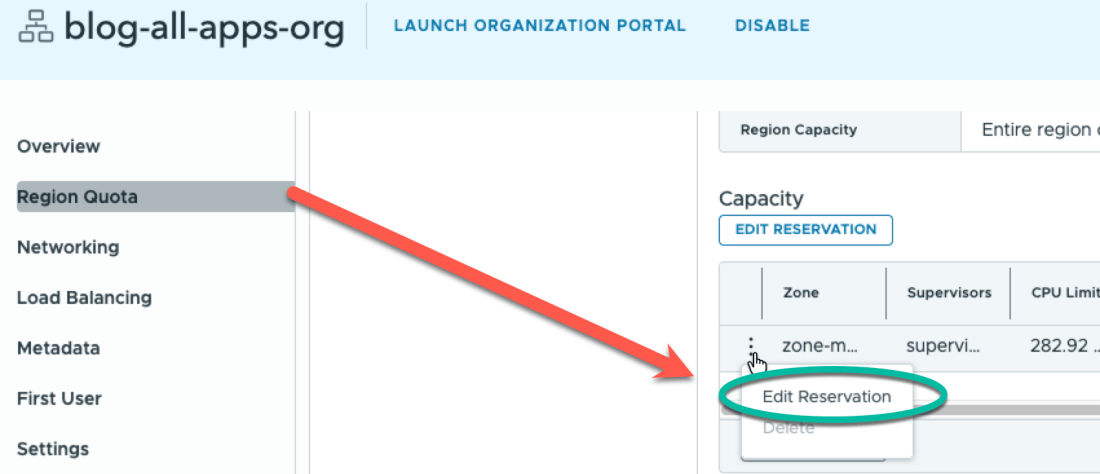
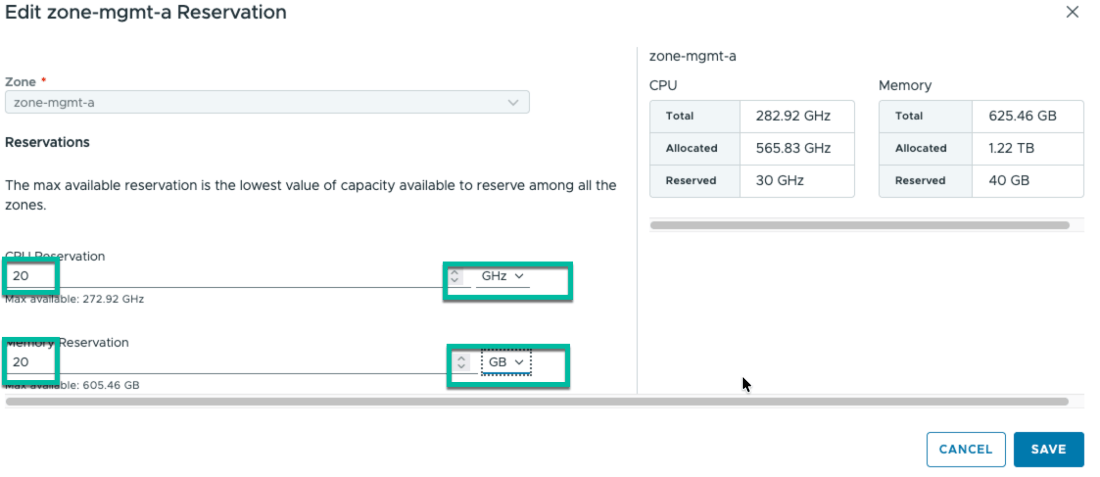
Change the CPU reservation and Memory reservation. I’ll keep the values small-ish, using 19 GHz and 19 GB to get started. These are lab values, not a universal recommendation. The correct numbers depend on the capacity available to the Region, the Organization’s other workloads, the Namespace Class, and the number of replicas you expect to run.
But we still get that warning. There must be somewhere else we need to update. Yep: the Organization quota is only one layer. We still need to update the namespace itself. Click EDIT RESOURCE LIMITS, then update the values.
Do not simply enter the full 20 GHz and 20 GB in both places if the parent reservation is 20 and the platform needs to account for the rest of the allocation. VCFA performs its own capacity calculations and can decide that the child reservation would exceed what the parent can provide. Leave a little room while you are learning the model, and increase the parent and child values deliberately rather than guessing.
Now let’s see if we can deploy that container. That is better, we got past the warning page. We’ll keep most of the values at their defaults for this first pass, but I’ll call out the ones we change. The image below comes from Docker Hub, which keeps this first test focused on scheduling and basic container execution rather than private-registry authentication.
| Option | Value |
| Primary Container Image | docker.io/library/nginx:alpine |
| Requested CPU | 250 millicores |
| Requested Memory | 256 MB |
If all goes well, you’ll end up with a Ready container instance in a short while. “Ready” is useful, but it has a specific meaning: the platform has admitted the resource and the workload has passed its readiness checks. It does not automatically tell us that an external client can reach the application.

We should also see a Running Instance. At this point, we have proved that VCFA and Supervisor can create and run the workload in the namespace. We have not yet proved that our laptop, browser, or Holodeck client has a route to it.

But woe is me, I can’t reach the Pod to view the page, boring though it may be. Why? The Pod landed on a private VPC network. That is not necessarily a failed deployment. It means the workload has an address on a network that my client cannot directly reach.
This is another useful boundary to remember: a Pod IP is not automatically an externally reachable application endpoint. The namespace determines the Pod’s primary network. To provide a client-facing address, we need a Kubernetes Service and a load-balancer provider, plus routing and firewall policy that allow the client to get there.
Let’s redo this, only this time add a load balancer during the request. We’ll use the same settings until we reach Advanced Setting (Optional). Expand Load Balancer, then click ATTACH LOAD BALANCER. We will expose HTTP port 80 and send it to port 80 in the primary container.
| Name | Value |
| Name | blog-lb |
| New port Name | http |
| New port Protocol | TCP |
| New port Port | 80 |
| New port Target | 80 |
| Attach to Primary Container | Checked (Yes) |

Click ADD, then SAVE. Click NEXT to review and confirm your choices, and finally click CREATE CONTAINER INSTANCE.
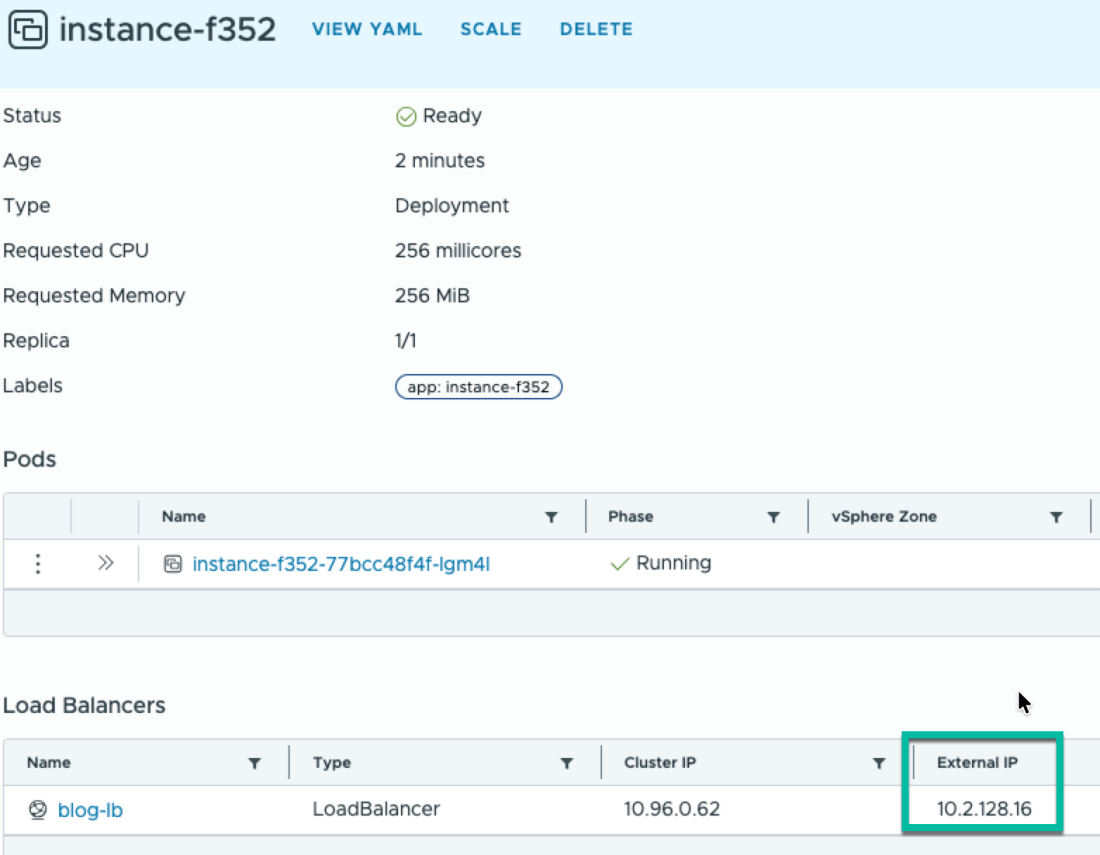
If all went well, we should have a Ready service shortly. Click the new instance to find the load-balancer address, then browse to it to validate the deployment.
The important difference is that the load balancer gives the client a frontend address while the Pod remains on its workload network. The Service still needs a healthy backend, and the network path still needs to work, so an allocated address is a good sign but not the final test.
Hey, it worked!
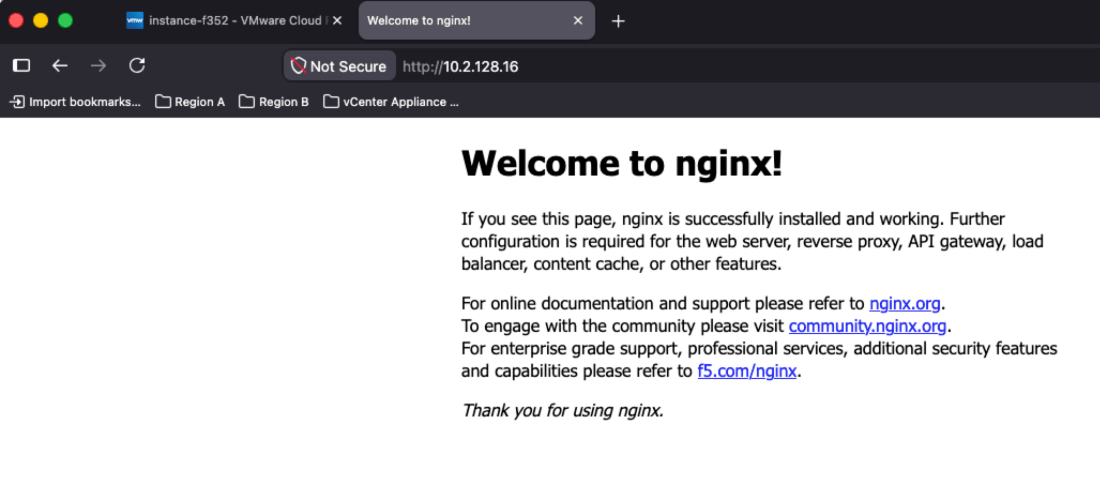
There you go. We started with a new All Apps Organization, discovered that a fresh environment can still have insufficient capacity, corrected the Region Quota and namespace limits, deployed a vSphere Pod, found that its private network was not directly reachable, and then exposed it through a load balancer.
That is a useful first pass because each step tells us something different. The Ready instance proves that the workload was admitted and started. The load-balancer request proves that we asked the platform for an external frontend. The browser test proves that the client can actually reach the application. Those are three different claims, and keeping them separate makes the troubleshooting much easier.
Up next is setting up a local Harbor container registry and using a private image instead of docker.io. That introduces a few new characters: TLS trust, registry credentials, namespace-scoped image-pull Secrets, and the ESXi image-pull path. But that is for another day.
Disclaimer: Some of the stuff you see here has been checked out, tweaked, or even created by AI. Welcome to the new age, folks!
